

Savannahgans® Magazine DIY: How to Make Your Own Cat Window Shelf
So, Your Cat Wants a Window Shelf?
Almost all cats love sitting in the window, looking at the birds, getting some sunshine. In many of today's newer homes, windowsills are small and nonexistent at 3.5 inches. Some of our cats can barely fit a single paw on THAT expanse!

When I began considering building a window shelf for my cats, the biggest consideration (literally) was Ascher, the F2. I determined the shelf's dimensions based on that aspect, plus the window I wanted to install it in. To assist you in this part of the planning, I'll walk through the questions I needed to answer before even putting a pencil to paper for the plan.
First, think about the obstacles in the window itself--latch, security, etc. Consider the windowsill depth so that you can determine the depth of the support corbels vs. the overall depth of the shelf itself. Then, consider your chosen window and your cat's size and decide your shelf's maximum length. Use a stud finder to locate any wall studs into which you can attach the support corbels. It's best to have at least one screw sunk into a wall stud for sturdiness. You can also use screw holders if necessary. There's usually a horizontal "footer" stud along the bottom of the window, and your top anchor screws can go into this.
For example, the window I picked is an 8' window, with 24" sliding windows on each side. So, I had to consider the window hardware and ridges and rout a small notch (rabit) to accommodate a portion of the frame in the back of the right side.
You'll want to think about the height you want for the sides. I decided on 4.5" because of Ascher, but you might get away with 3" sides.
I also wanted this shelf to have a more "furniture" appearance to it, rather than a basic pet store shelf. I chose to rout a decorative edge at the top, but it can be a simple, straight board, with the top edges sanded round. If you want something a little more decorative but don't have access to a router, the home improvement stores have wooden crown and baseboard molding that's inexpensive and works well.
More to consider before designing are the support corbels, they can be a simple triangle of wood cut to the correct size, or you can fancy them up with curves and routing.
Consider also the type of wood you want to use. If you're going to stain it, you'll want a nice-looking board for the sides and corbels (I used solid soft maple), and you can save money for the base using good plywood (again, I used ¾" maple plywood). If you want to paint the shelf, then a nice, straight pine board will be sufficient. You can pretty much have it any way you wish to, stain, paint, size, plain, fancy, etc.!
Suggested Equipment List:
Circular Saw or Table Saw
Router and Decorative Bits
Miter Saw
Band Saw
Brad pinner if necessary
Small level
Sander/Sandpaper
Clamps
Wood glue
Mounting Screws, including screw holders, screwdriver, drill bit for pilot holes
Frog Tape
Measuring Tape
Materials List:
¾" Plywood rectangle for the base (my outside dimensions for the shelf were 14" deep x 24" wide)
4 ½ "wide board for sides, front or crown/baseboard molding in a sufficient length (front plus two sides, plus some for mitering corners)
¾" Boards for Support Corbels equal to the depth and twice the height (for 2) I started with 8" x9" rectangles
¾" Backers for the Support Corbels- these can be 3-4" wide and the height of your Corbels, plus a couple of inches. You can cut these from the board you get for the front and sides if you add 20" or so.
Stain or Paint, brushes
Pet bed or mat for softening the bottom of the window shelf

Once I laid out the measurements necessary in my plan, I started cutting the components. To ensure a good fit between the bottom of the shelf and the front/sides, I made a ¾" high, 3/8" deep rabit on the inside, bottom edge of the front/sides. If you don't have a router, gluing and pinning will work just fine.
Next, I cut the plywood for the base, remembering that the back will fit right up against the window frame and not have a raised back. If you put a rabit in the front/sides, cut the width of the base ¾" shorter and cut the depth 3/8" shorter than the eventual outside dimensions to allows for a tight and secure fit.
I used the router for the decorative edge I wanted on the top edge of the outside of the front/sides.

Next, fabricate the support corbels and their backer. Depending on your choices, simple or fancy, the corbels can be shaped with a band saw and sanded smooth, or use a decorative router bit. The backers are just 3-4" wide, and the height you chose for the corbels, plus an inch or two. The corbels are screwed to these backers from the BACK after staining or painting used 1 ½" screws to affix the corbels to the backers.


At this point, you can stain or paint the individual pieces (which is what I like to do), or you can assemble, then stain or paint. I prefer to stain the individual pieces; that way, you don't have to deal with getting the stain or paint into tight inside corners.
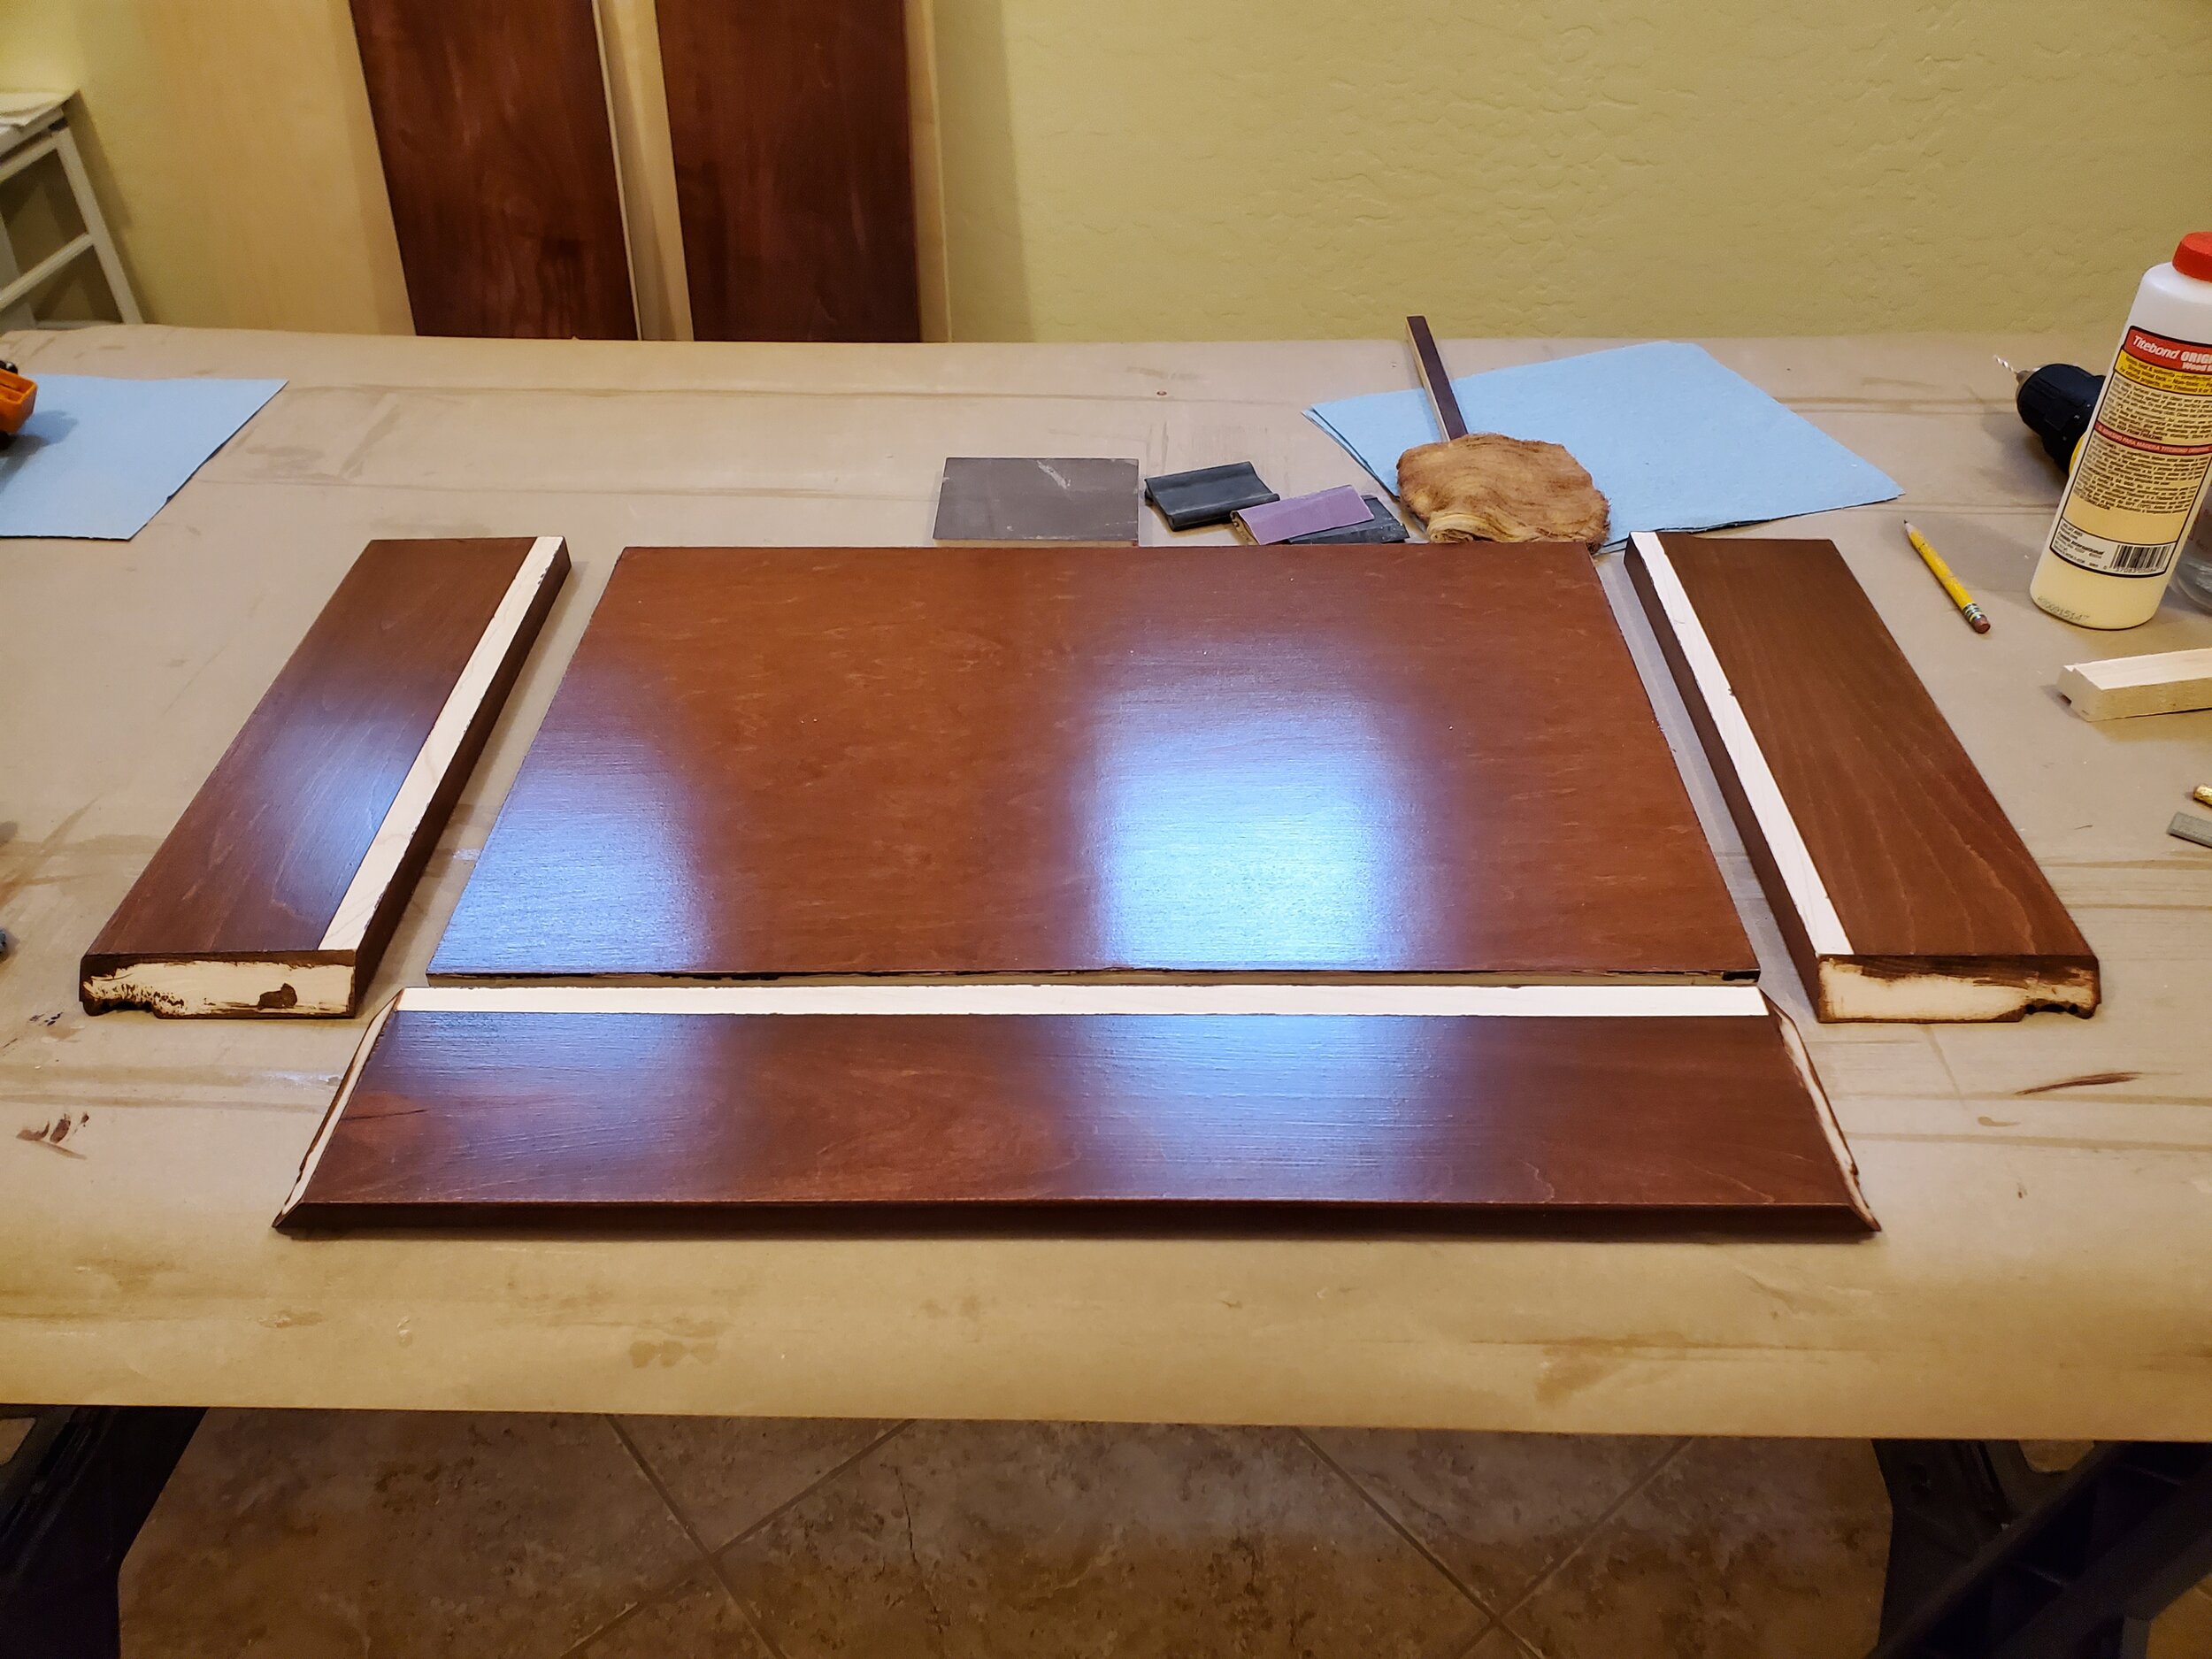
Once the paint/stain cures, assembly begins! I mitered the corners of the front and sides to get a nice look; however, if you don't have access to a miter saw, these can be "butt" joints. If so, the front piece should go the entire length of the shelf and the sides glued flat up against the front. Make sure to sand smooth. Once glued, I used some small pins to secure the joints and pinning the base's front and sides.
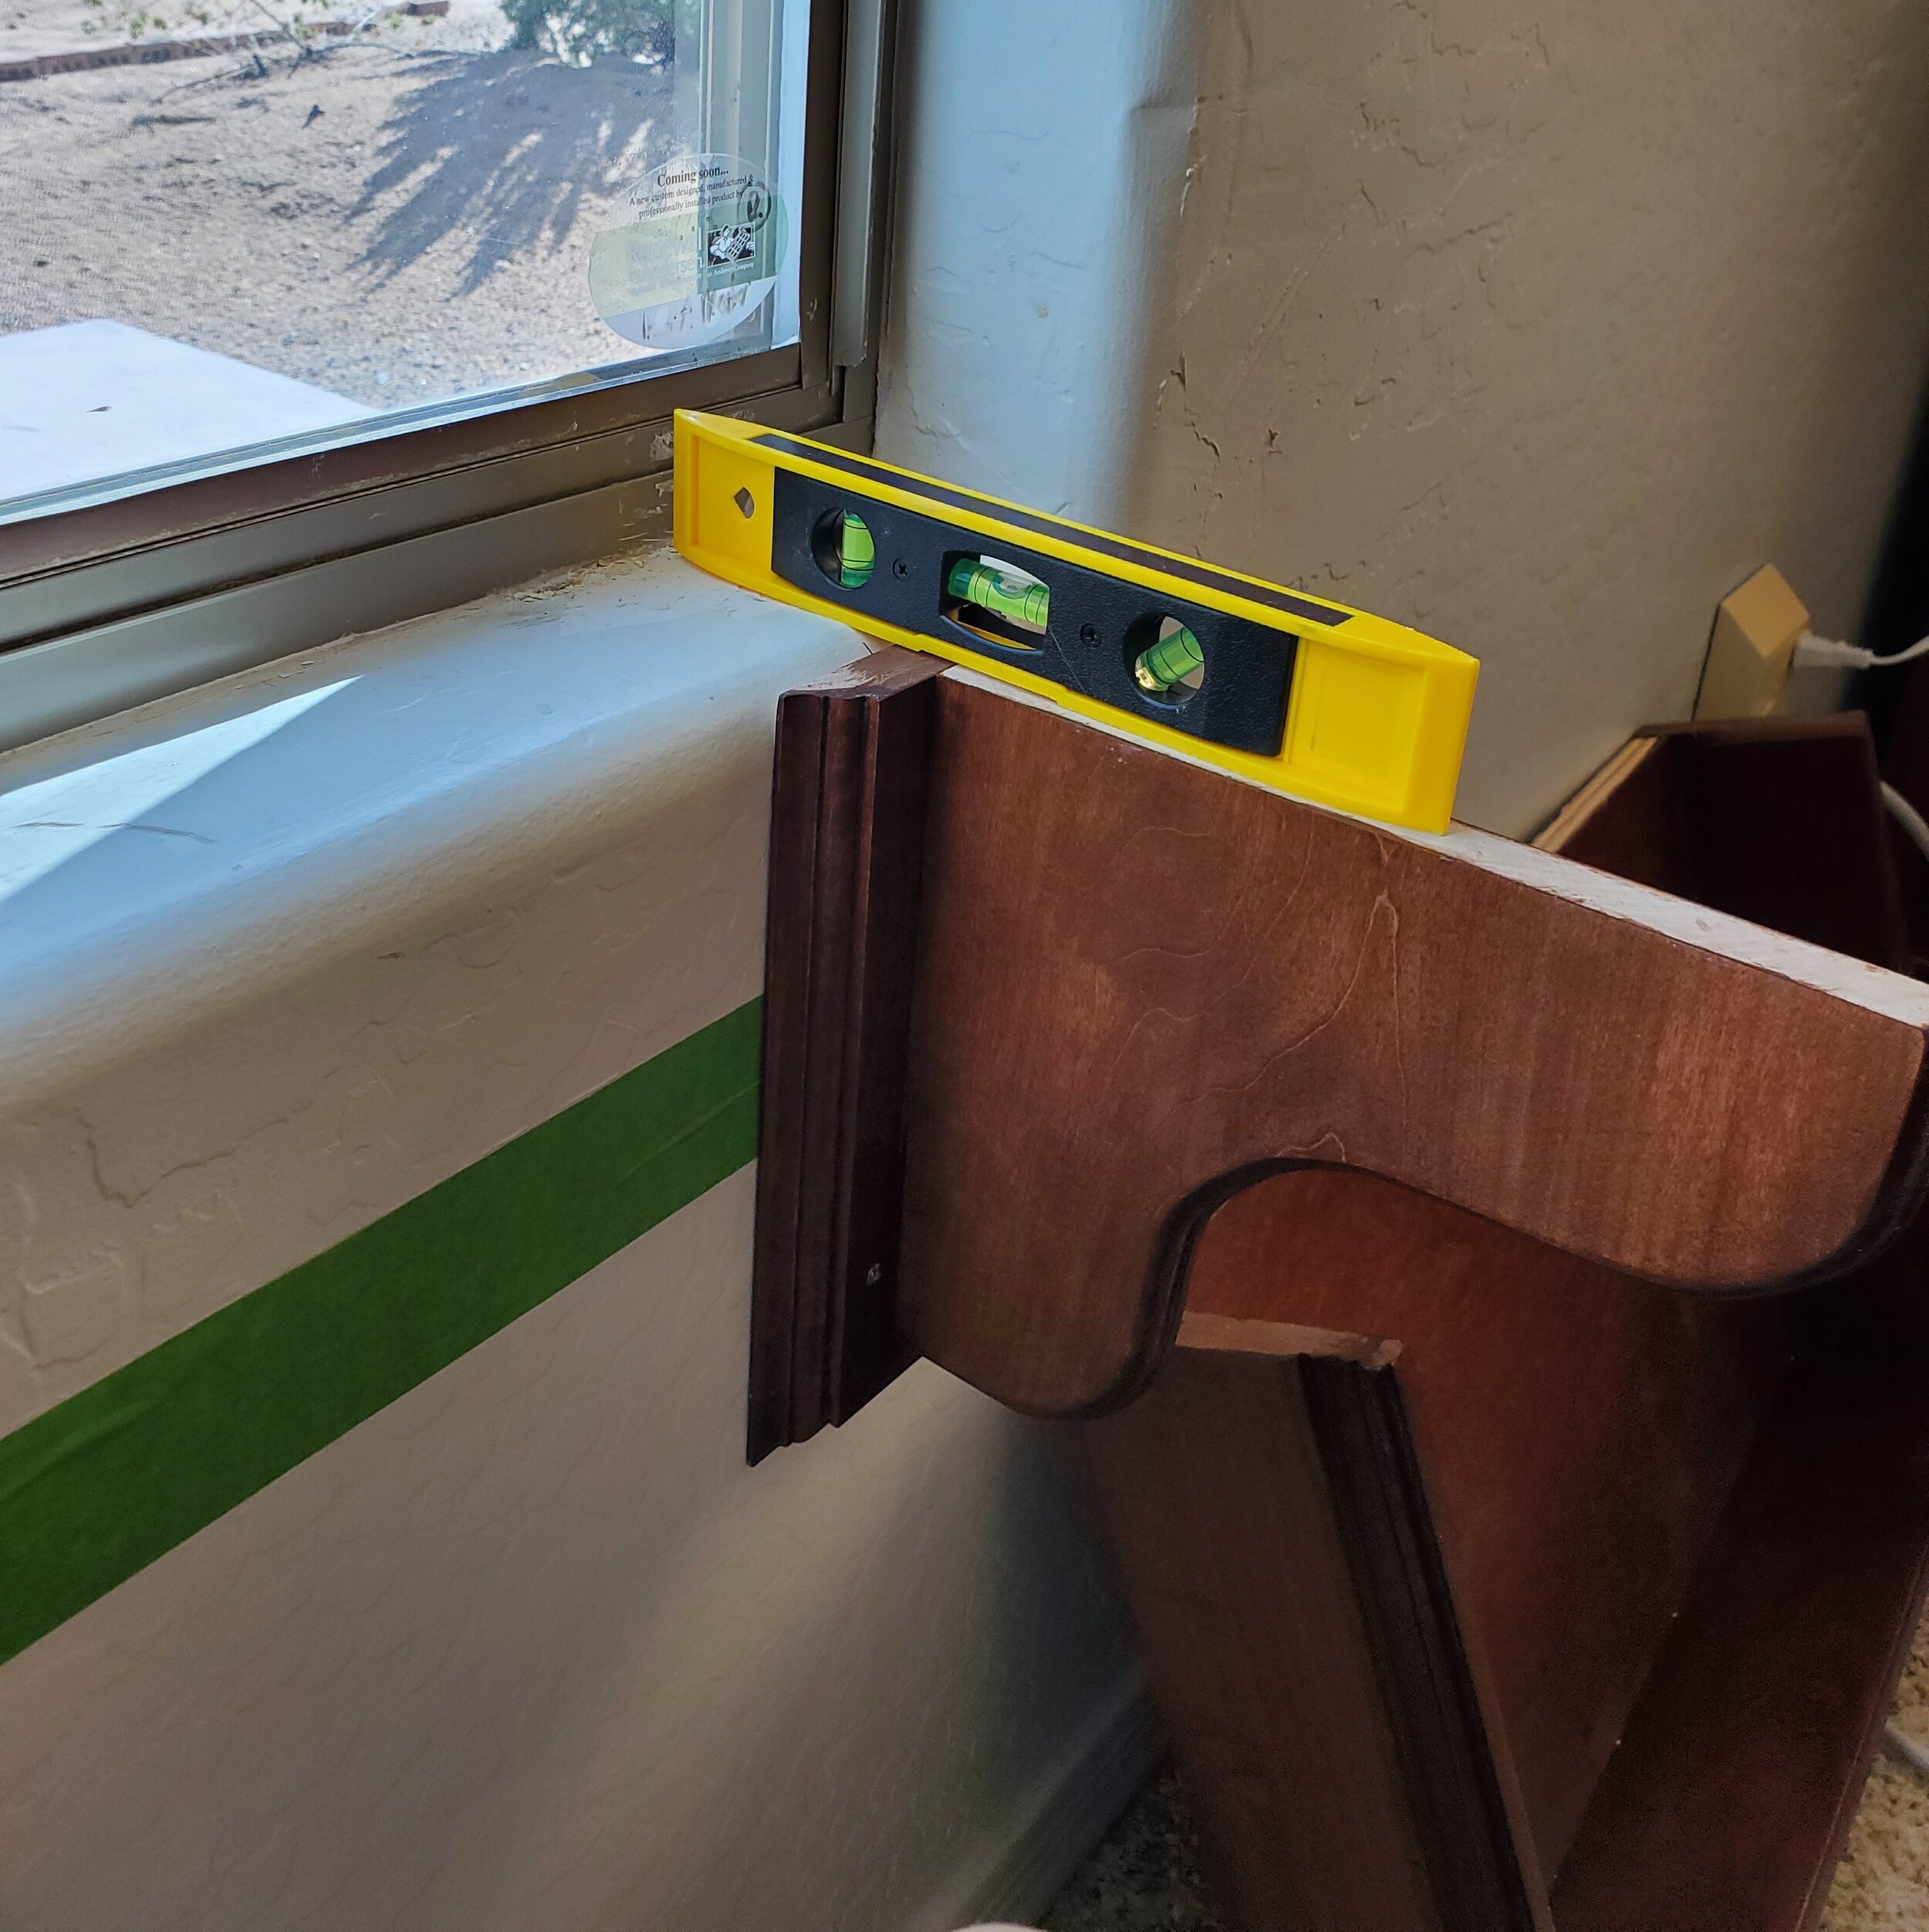
Once the corbels have been glued and then screwed to the backers, it's time to take your project to the intended window!

After determining where the studs (if any) are below the window sill, mark these with your Frog Tape. If there are no studs, space your corbels sufficiently apart to support the shelf (and cat!). I set mine about 4" from the outside edges of the window shelf. Mark these locations on the corresponding corbel backers and drill pilot holes for the anchor screws.
Get out your level! This part's vital as you'll want to ensure your window sill's bottom and your corbels' top is LEVEL. Also, check to make certain that the corbels themselves are plumb and not cattywampus! (pun intended)
I placed one screw at the top on the outside of each of the actual corbels in each backer. I used a two ¼" screw, sunk into the aforementioned window "footer." I then placed another screw (2 ¼" is fine) into the other side (inside) at the bottom of the backer (these went into the screw holder--no stud). Drill the holes to accommodate the plastic screw holders and insert the holders. I found having another pair of hands very helpful with this step unless you are adept at using your knees as balancer/holders. Screw the corbels/backers to the wall.
Set your shelf onto the corbels (DO NOT attach them yet!). From the bottom, mark your base where the corbels line up—drill pilot holes in the center of those marks. For instance, my shelf is 14" in-depth, the windowsill is 3," and the corbel depth is 9". I set my screw holes back about 5" from the front of the shelf to make sure I did not have a screw come through the bottom of the corbel. Now go ahead and put the screws through the bottom (from the TOP) into the corbels. Place two more screws through the bottom toward the back of the shelf into the windowsill. I used 2 1/4 "screws for these attachments.

Place your pet bed or mat into the window shelf and watch out! Your kitties will be racing to see who gets into it first!!!

Do you have a DIY project to share with your fellow readers? Let's hear it!
BEFORE YOU GO, WE NEED YOUR HELP TO MOVE UP THE RANKS ON GOOGLE!
Help SAVANNAHGANS® Grow and Reach Every Savannah Cat-Owning Household! All support is humbly appreciated (visit the clickable underlined links).
Subscribe (free) (by visiting the banner on our home page) and receive each quarterly issue to your inbox.
Share this article on your own social media platforms.
Leave a Comment. (this is VERY helpful to our growth and Google recognition)
Follow on Instagram.
Follow on Twitter.
Follow on Pinterest.
Follow on Youtube.