

SAVANNAHGANS® Magazine DIY: How to Make Your Own Amazing Cat Tree
Written by: Keri Libbe, Savannah Owner and Creator of the DIY Cat Tree
We started making our own cat towers and trees because our Savannahs grew too large to comfortably and safely maneuver in the trees we'd purchased. Our Savannahs include three-year-old F2 Echo (20lbs) and near one-year-old Ronin (nearly twice Echo's physical size and 24lbs). We also have Zeke, a 10-year-old Maine Coon whose size isn't an issue for most trees.
During a trip to Madison, WI, to see our daughter, who was finishing Vet school, we visited a pet store that sold fantastic trees from Paw Friendly Furniture. We purchased a very aesthetically pleasing seven-foot tree. To fit in our SUV, we removed the top bed and made an uncomfortable nine-hour trip home. I love everything about the tree, as it's the one our DIY trees are based on. I'd gladly purchase more of their beautiful, reasonably-priced trees, but sadly, the out-of-state shipping is cost-prohibitive. Paw Friendly initially agreed to let us purchase their larger beds to build our own trees, but they no longer sell their beds separately. Note: If you're in the Madison, WI area, their trees are sold in several pet stores and are instantly recognizable. So, that's how we started.
Being active in the Savannah Facebook groups, people always ask about my trees. We don't build trees to sell and aren't experts, although we have construction experience and appropriate tools. We made these trees, and some towers, four our own cats. I'm sharing my DIY instructions from our recent build for those who want to attempt one.
WOOD
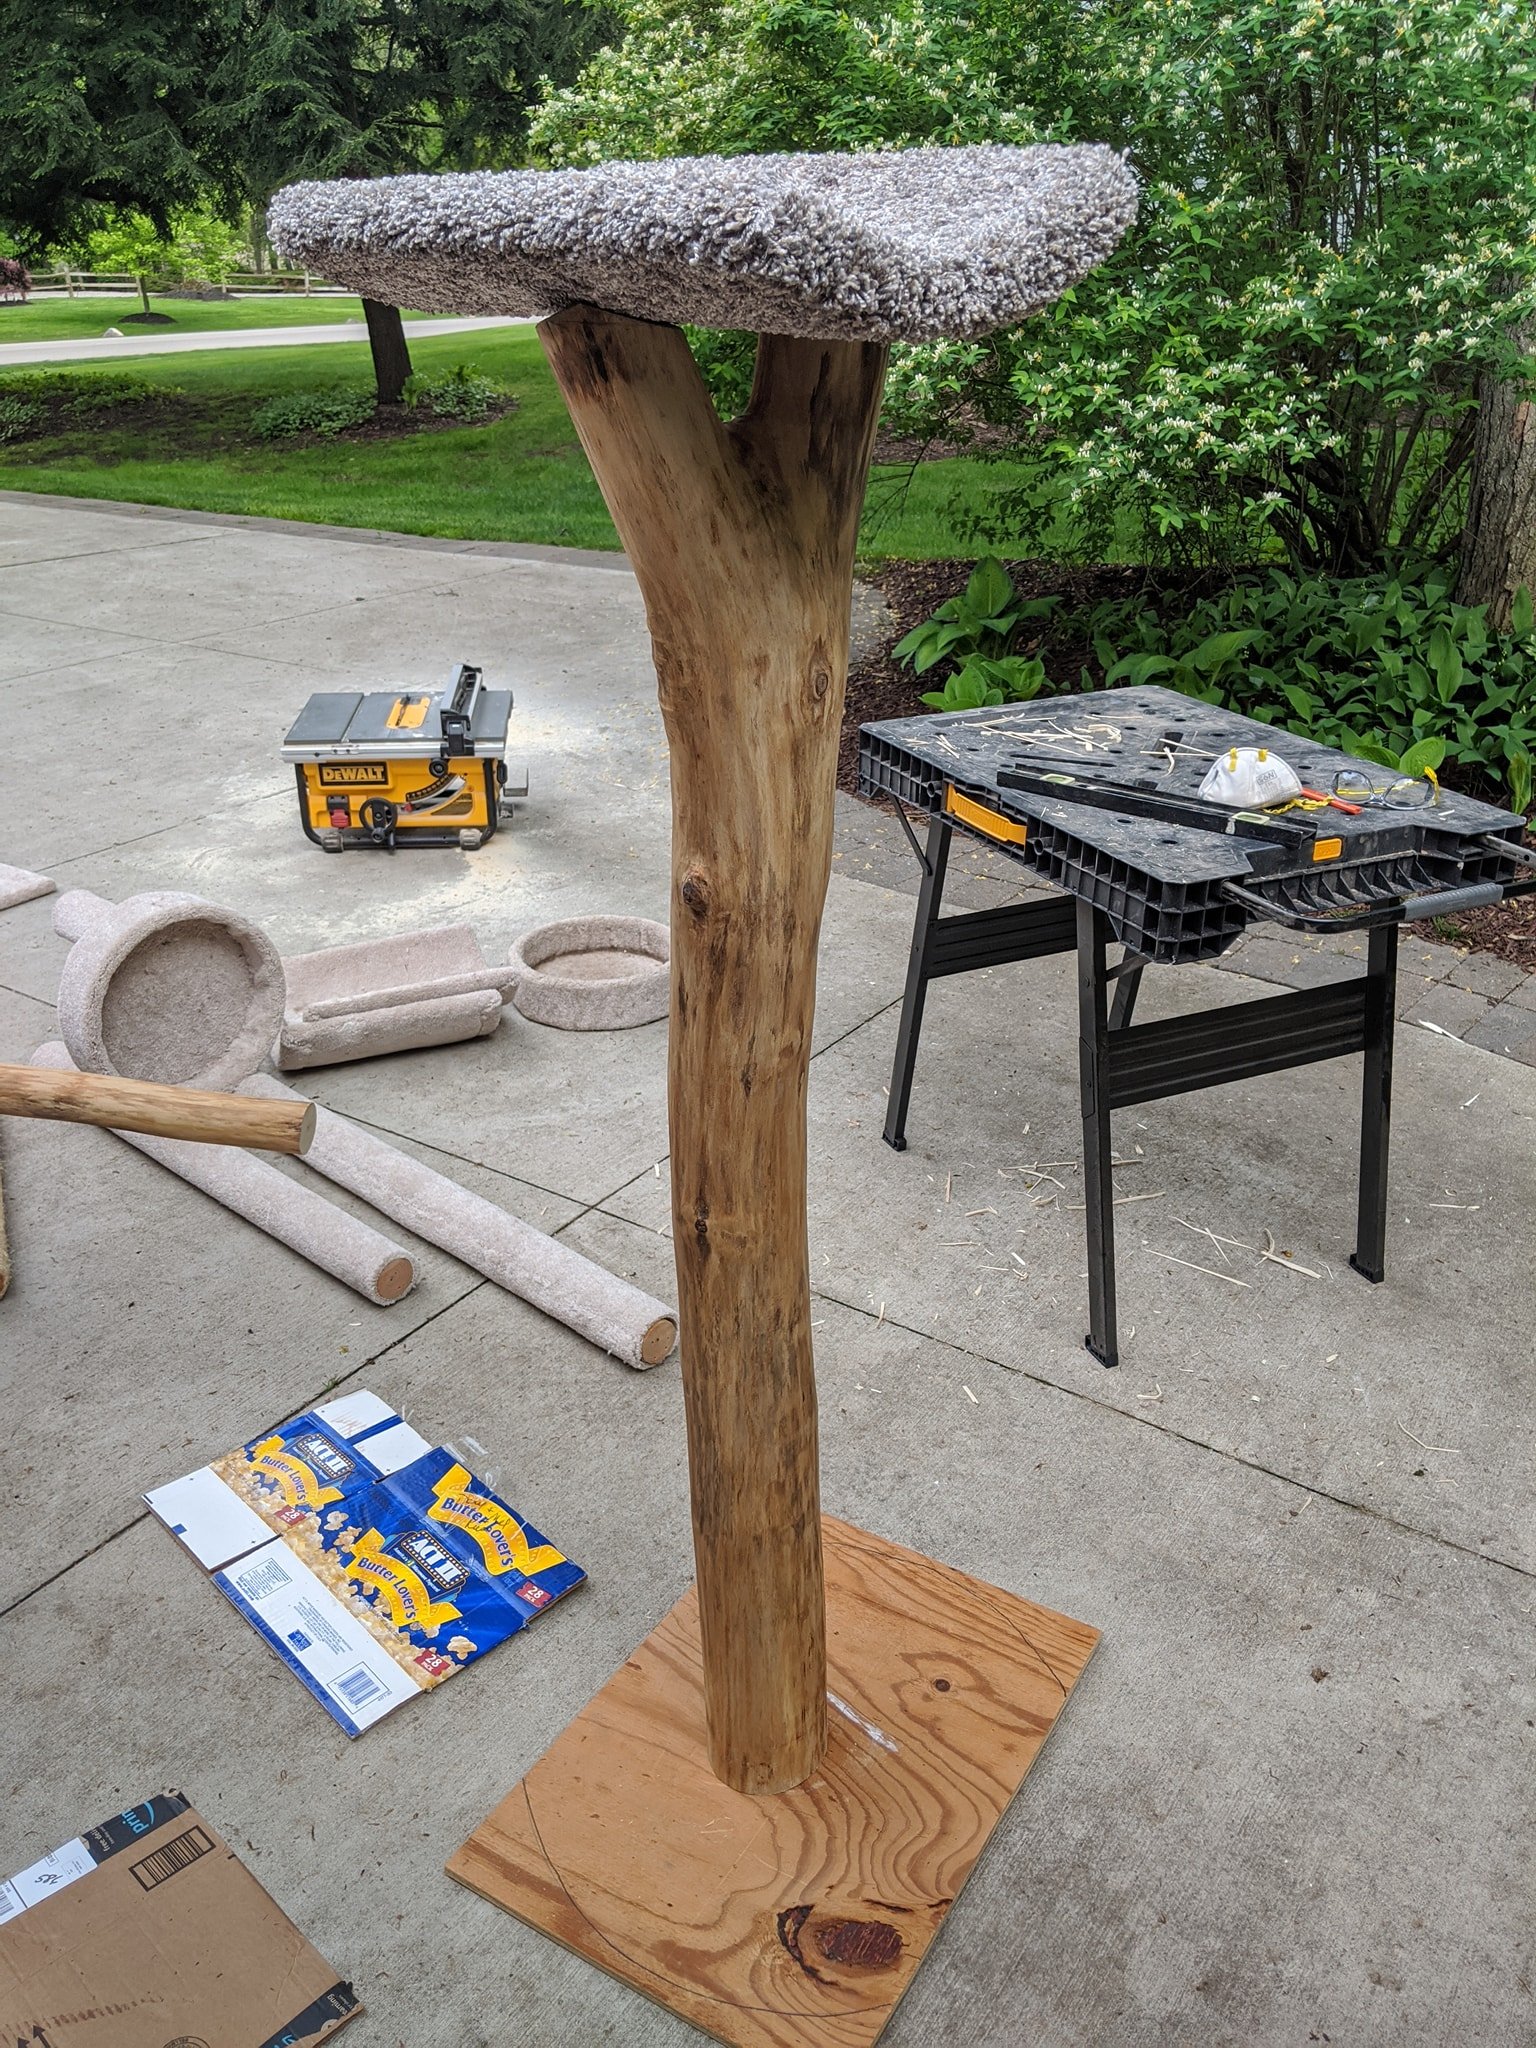
I start by finding downed trees I think are interesting. Ideally, they've not been lying on the ground, so there's no rot, and the wood is dry. I use a bark stripping tool and/or a chisel and hammer to remove the bark. I then use a palm sander and sand by hand. I finish the wood with natural beeswax and orange paste. Other non-toxic finishes would also be fine. I started this build with maple branches, but most of our builds have been hickory from our Kentucky property. I try to have at least one substantial base (about 4" in diameter), typically the tallest, but not always. Note: The logs need to be heavy to balance the tree. If they don't have enough weight, they will topple.
BEDS
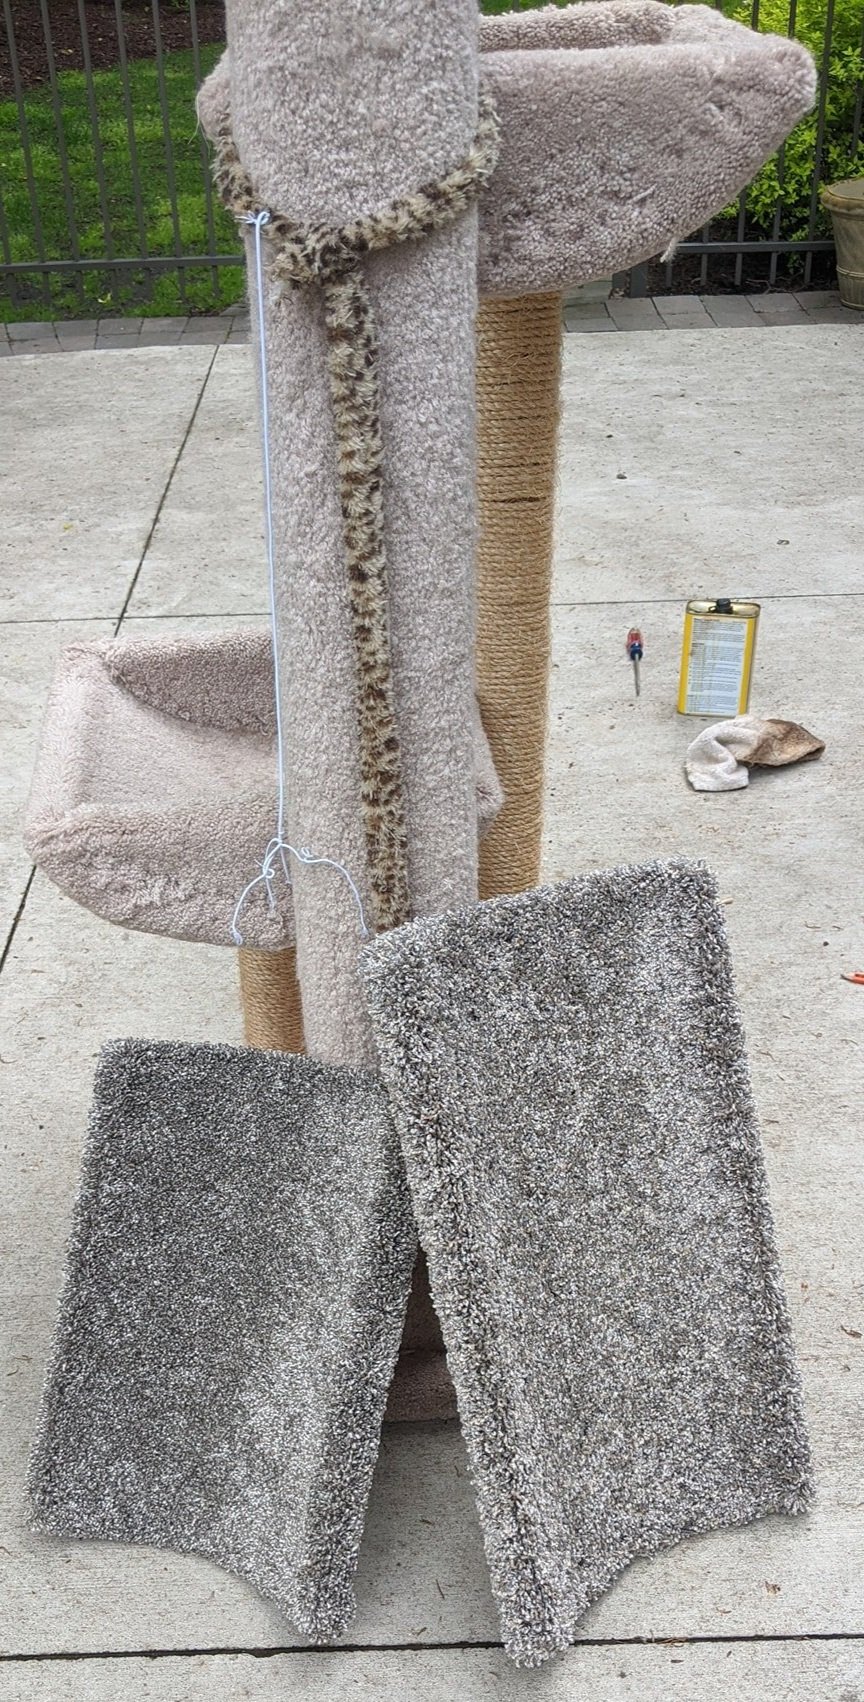
You can take apart cat trees you already have and reuse parts if they're fine for the size of your cats. I've repurposed some beds (for the lower "steps" if they're a color match) as well as roped poles from the trees I already have. Most builders use screws, so the hardest part is finding them in the carpet. We initially purchased the cat beds for most of our trees but can no longer get them from our provider. Our scoop beds are between 21 and 22 inches long. The bed on the right is one of our custom beds. The one on the left is one we took from a purchased tree for comparison. I know some people have substituted platforms for the beds, found others in their area who'll make them, or have made their own. There are no right or wrong ways of doing it. (The round beds we've used are 20” in diameter, but we didn't use one on this tree.)
BASE
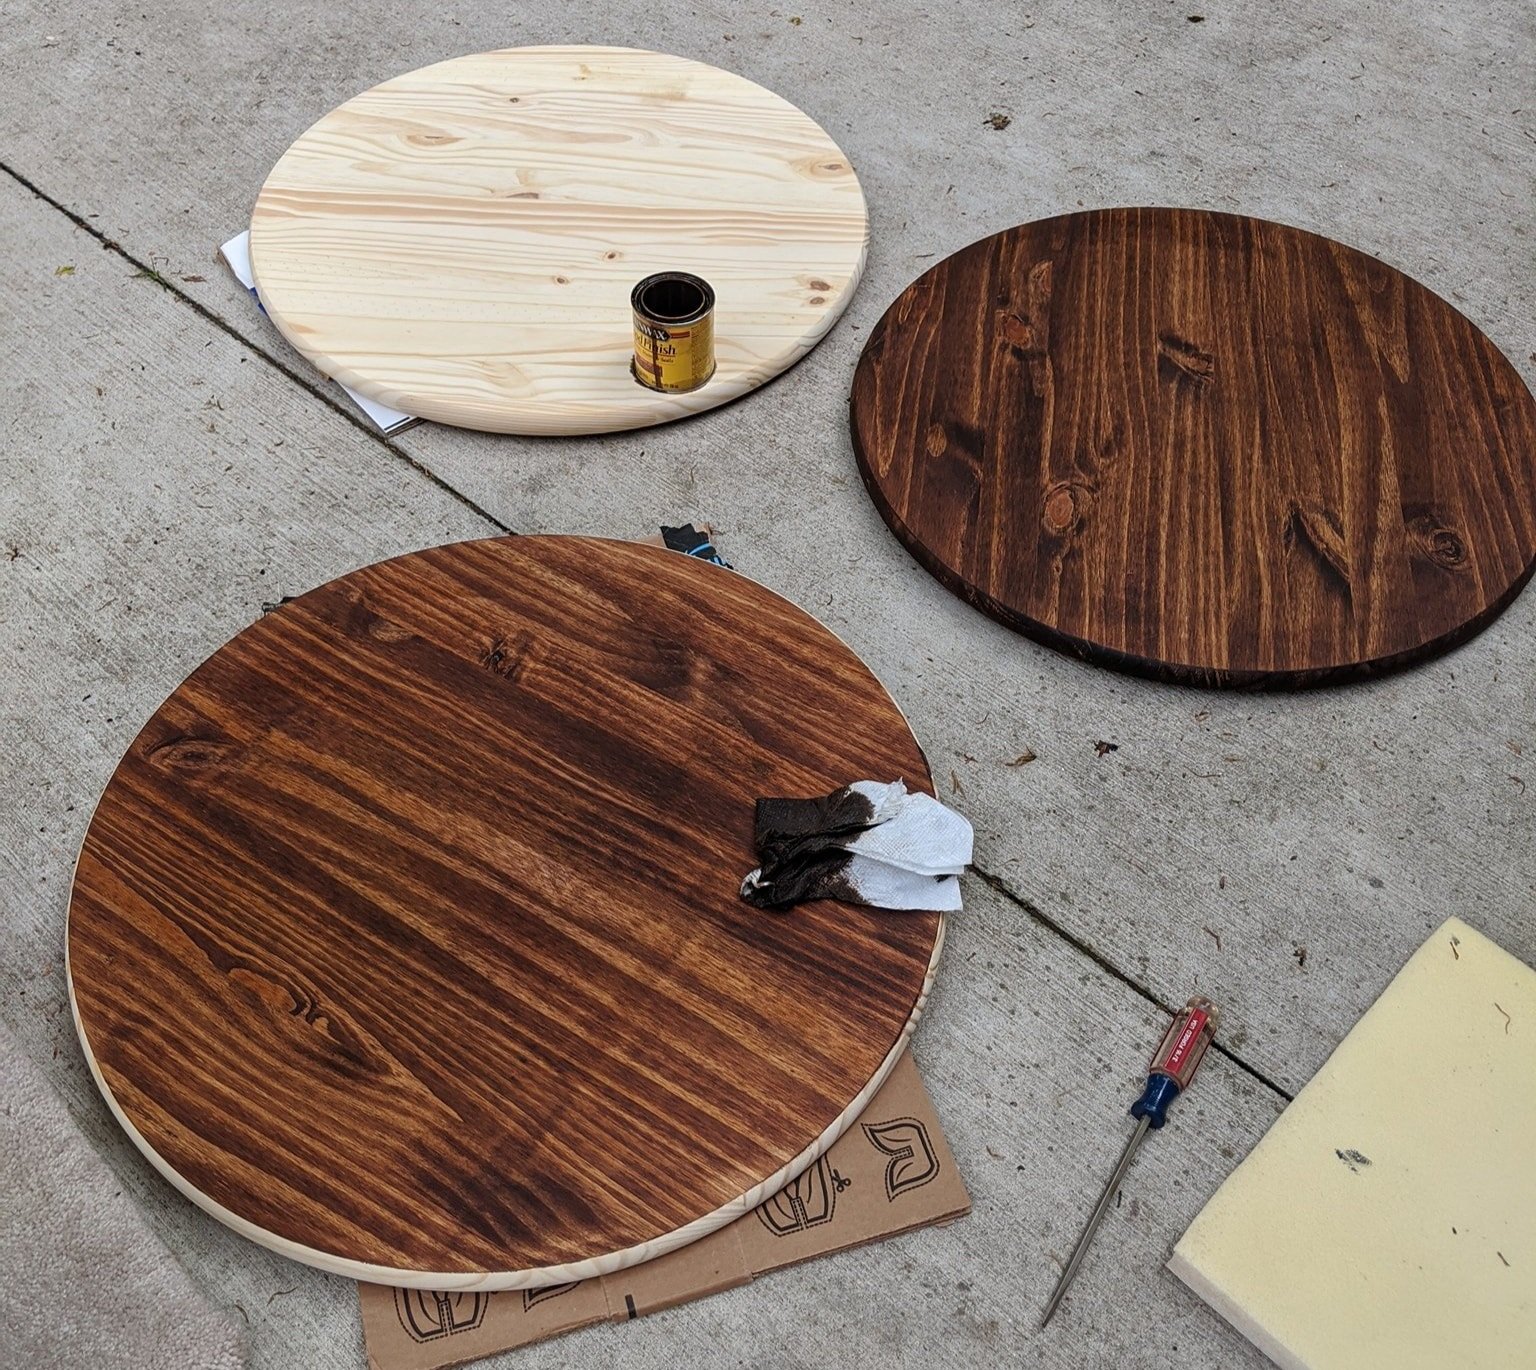
I typically use the pre-cut 1" x 24" (or 1” x 30" for our large/tall trees, which you must special order) pine rounds you can buy from Home Depot. You could also reuse a base from a purchased tree. I put felt furniture protectors on the bottom. It's the weight of the branches and how you space them out that makes the tree stable. The base doesn't have to be weighted if you plan it correctly. I stain these and use my beeswax/orange protector on them.
LAYOUT
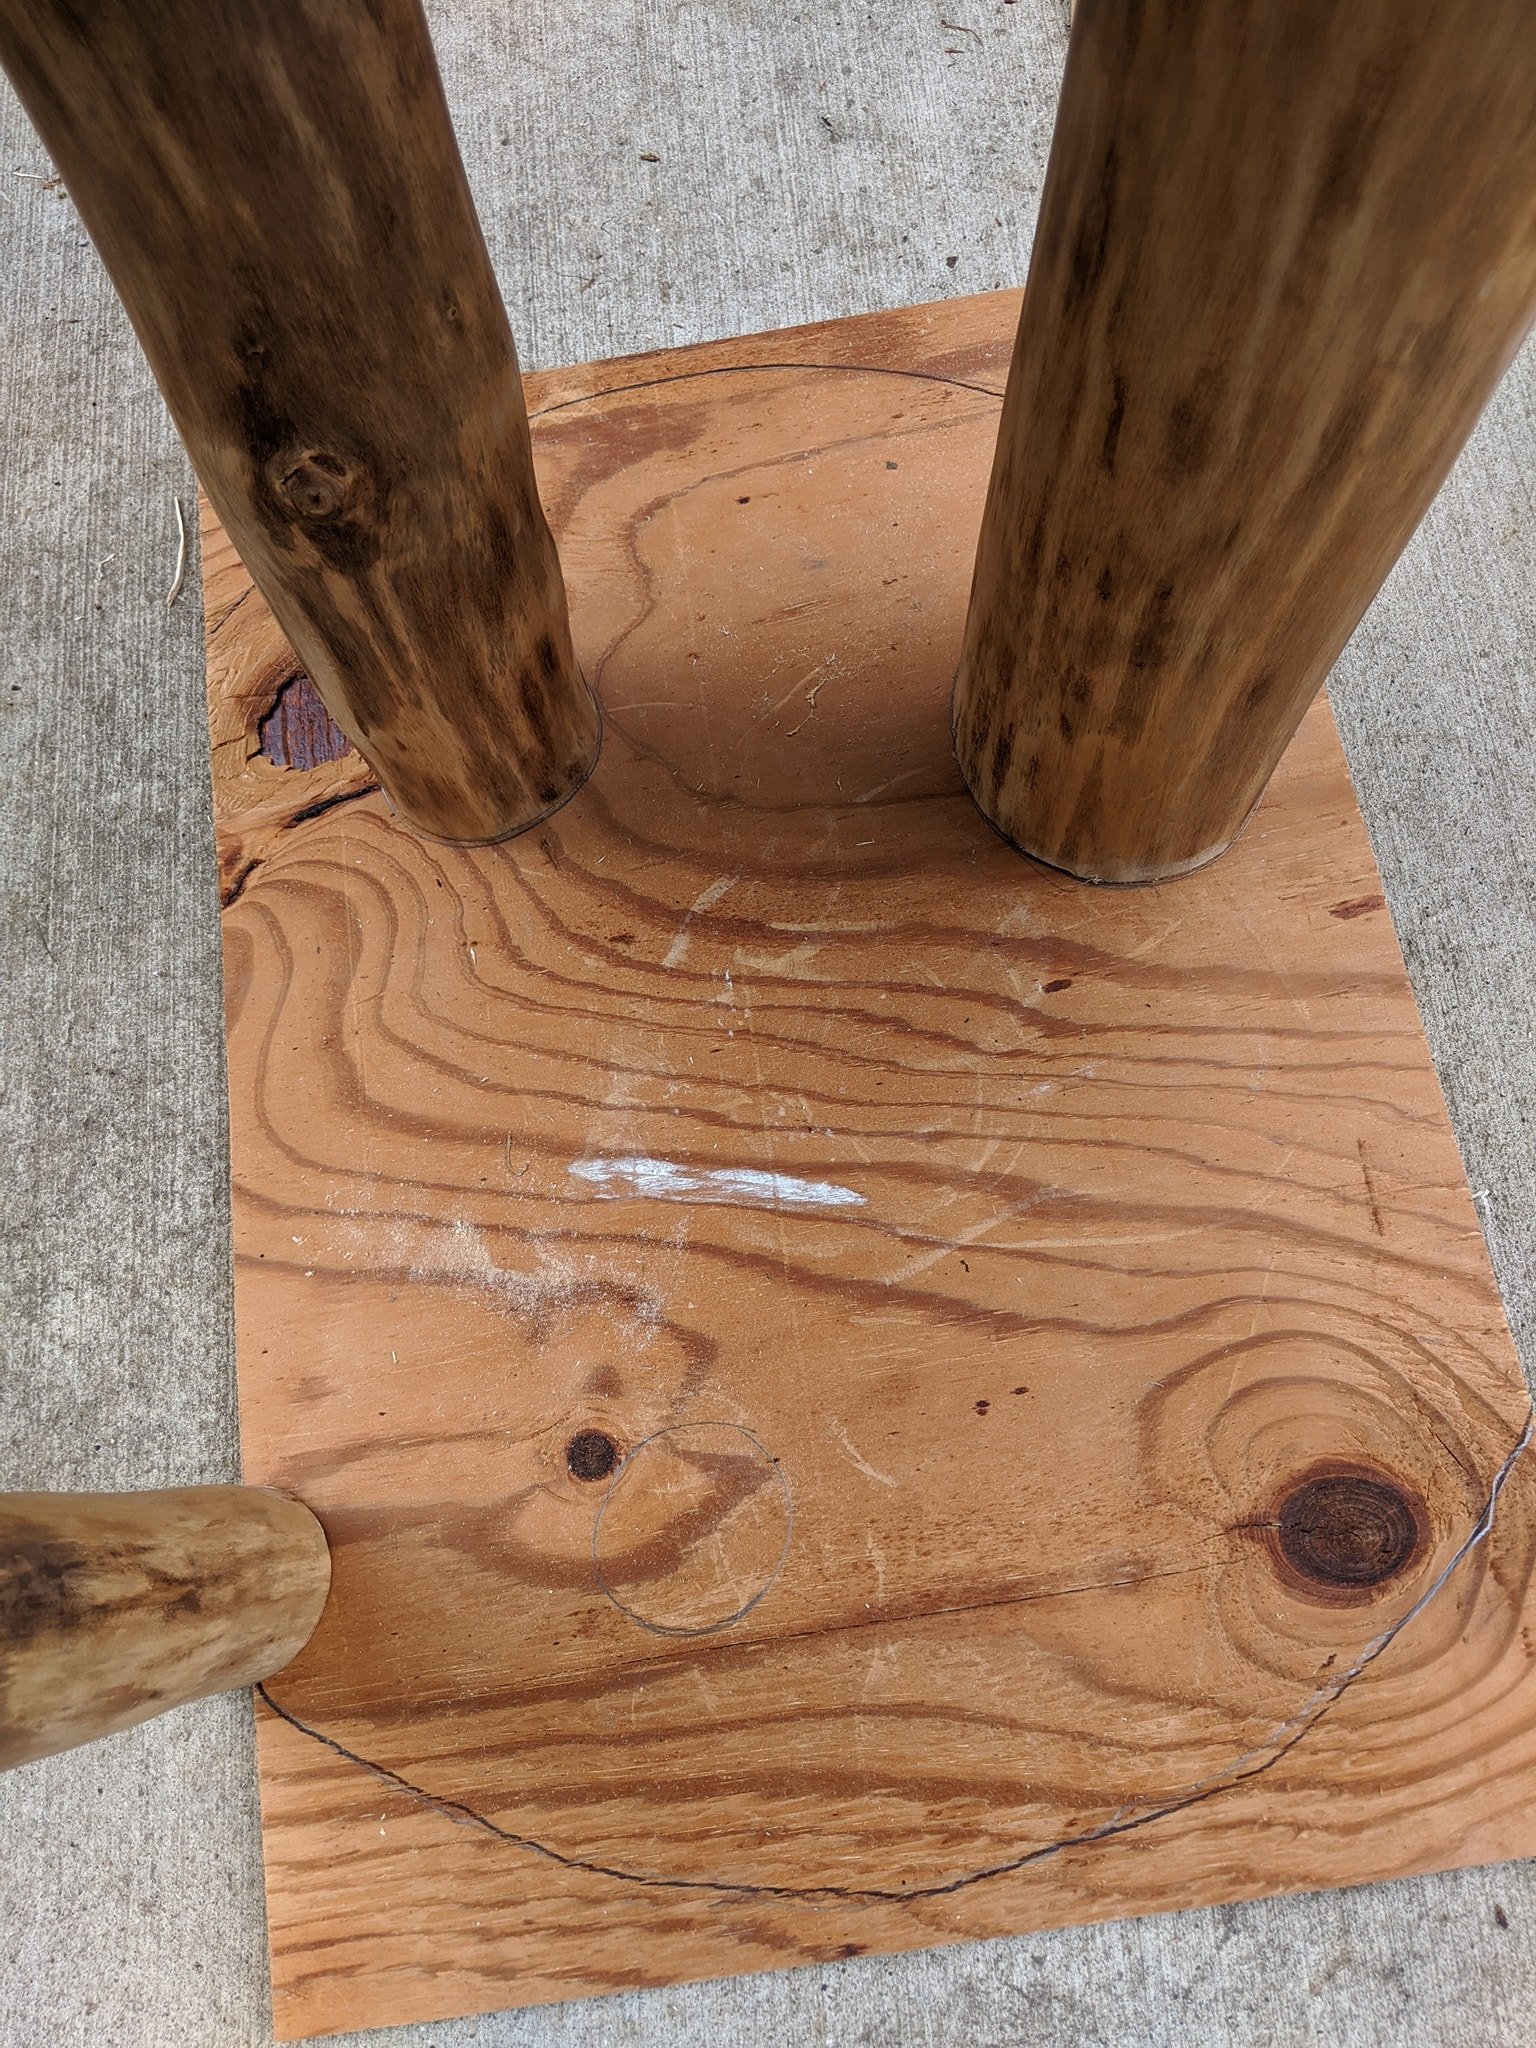
You need a vision before you start. I space the scoops/beds about 20" apart (less if your cats are smaller). How you arrange them is the fun part. It can be done in any manner, as long as there's room to jump from one to the next and enough attachment points between the beds and branches for stability. This picture shows the six and eight-inch lag bolts we use to attach the base to the branches from the underside and our template board Doug is holding. We start by leveling the branches so they stand on their own. Then, we place them on the template board and start playing with the layout. Once we have a couple of branches we like and an idea of where the beds will go, we drill the holes into the template board and attach the branches with lag bolts.
The large branch is attached to the bottom template. You can see the lines drawn on the template board tracing the circular base we're using in the actual tree. This ensures we're placing the branches appropriately.
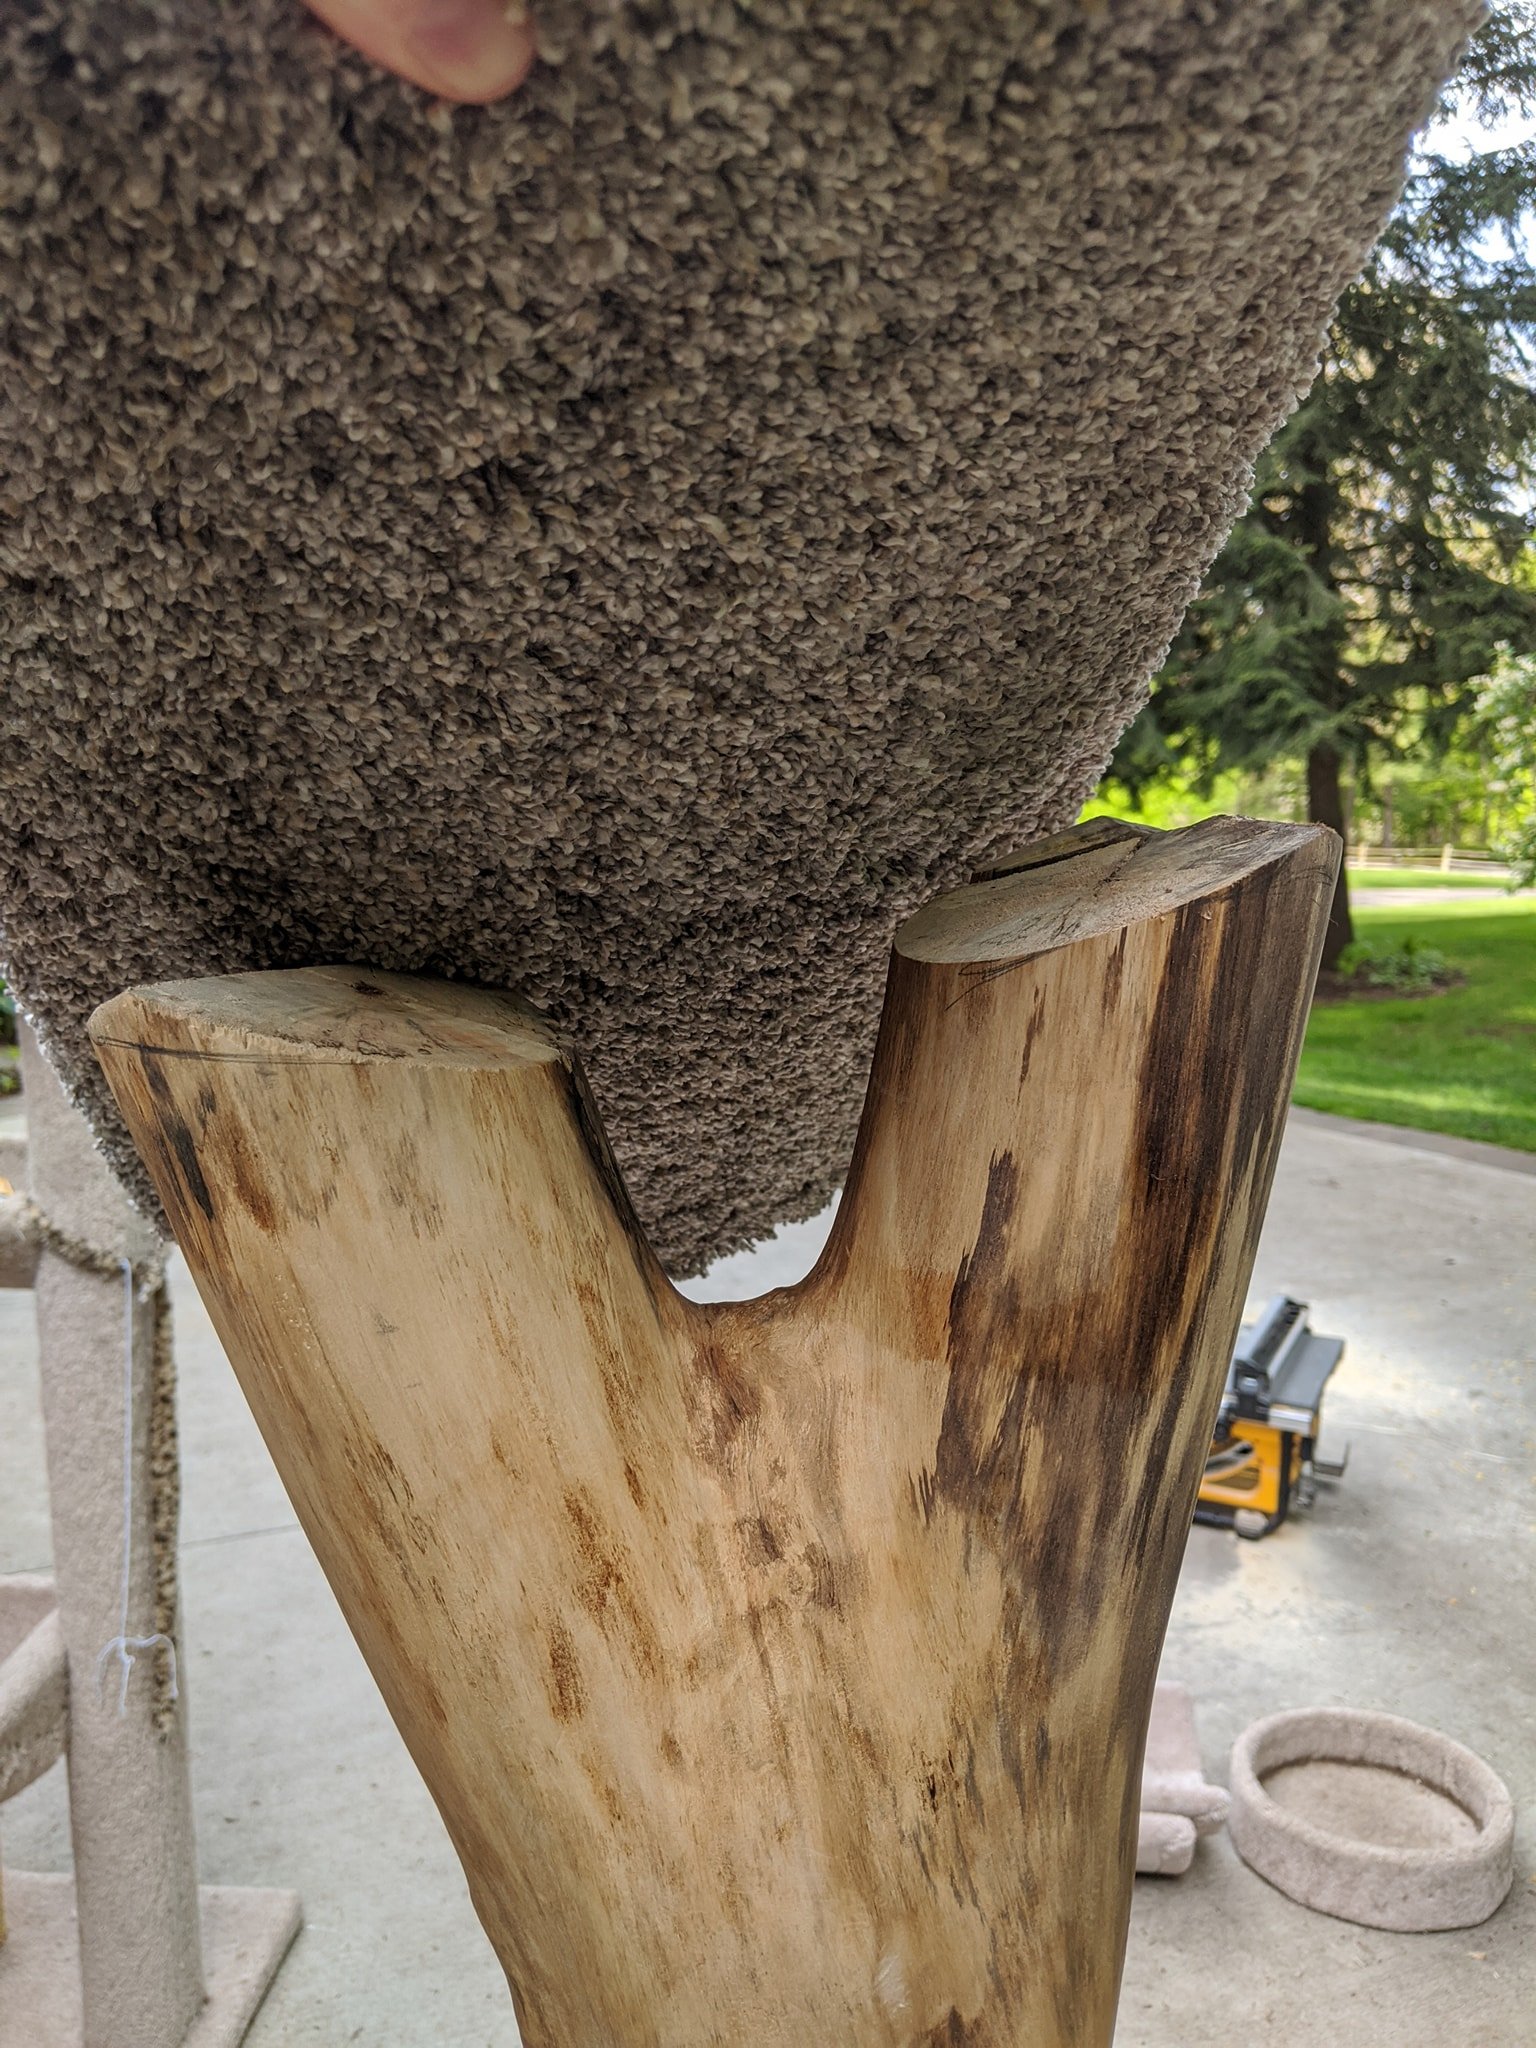
The second photo shows the cuts made to accommodate the scooped bed. We use a compound miter saw. (There's a table saw behind this, so I mention the miter saw for clarification).
TEMPLATING BASE
This is a better picture of the base template. It's an old 3/4" piece of plywood. When we've adjusted the branches to their approximate position, we draw a circle around each, using some identifier to establish how they were oriented on the template. You can see the branch I removed on the lower-left corner, with the pencil drawing to the right of it will be placed.
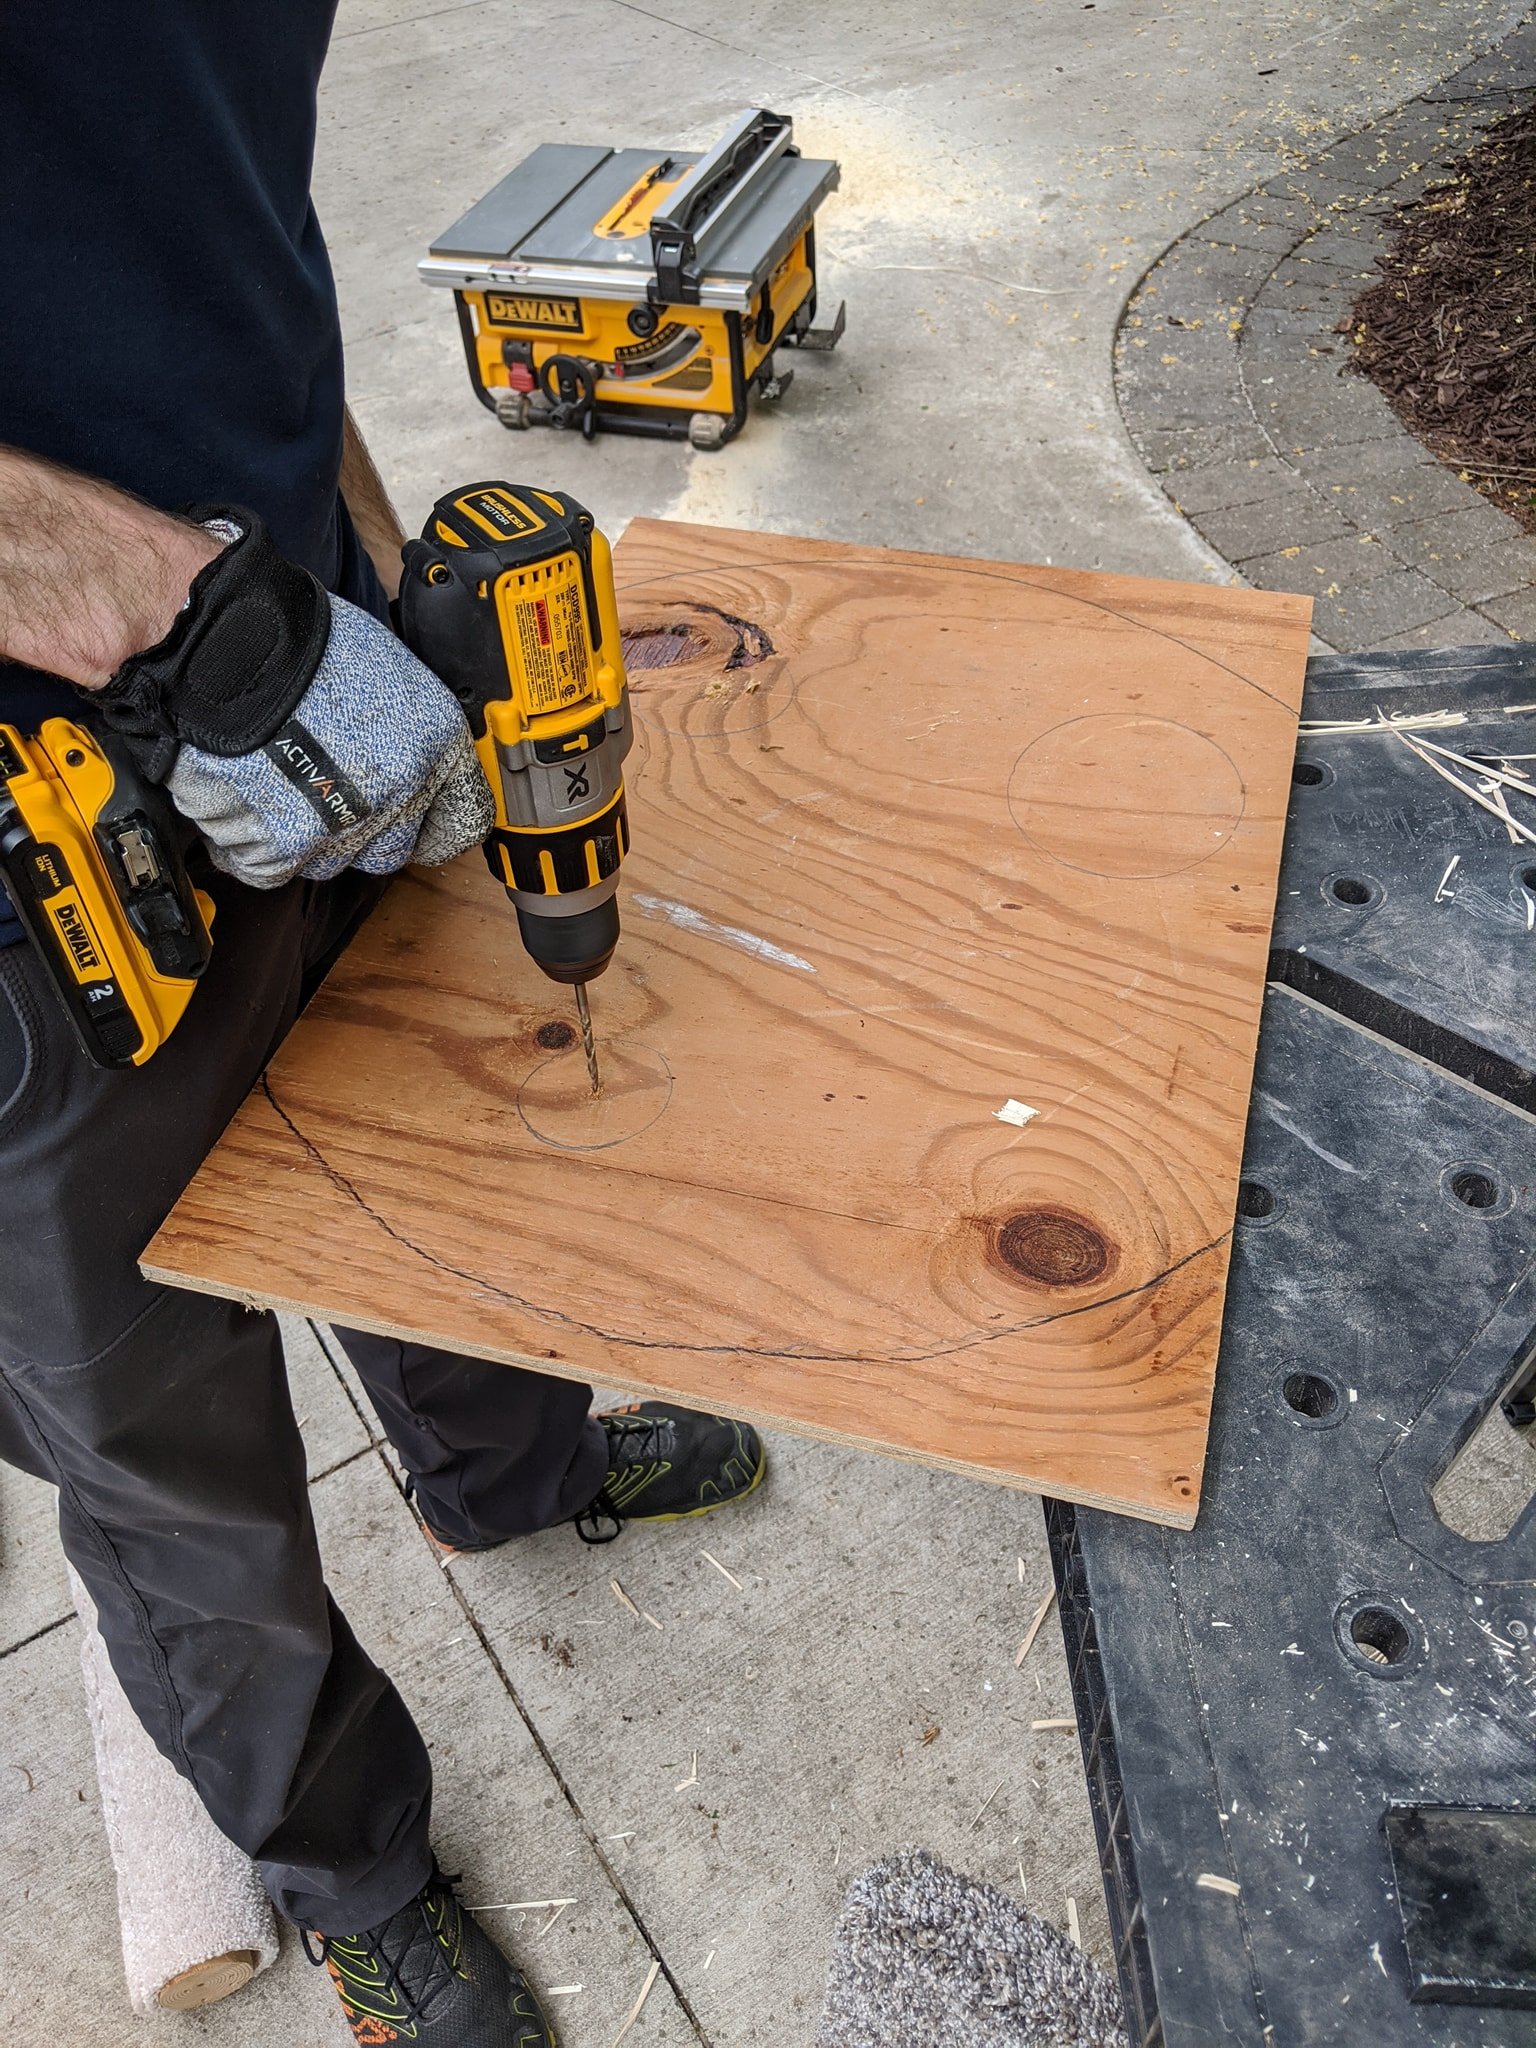
Next, drill one hole through the base on the template board for each branch/pole. The actual branches/poles will be attached with one to three lag bolts, depending on their diameter. (We start with one so we can turn the branches and adjust them for bed positioning more easily).
We use a short bench to place the pole back on the template and drill up from the bottom into the branches/poles, making pilot holes. We adjust the design by positioning the beds in place (the best you can without screws at this point). When satisfied, unscrew the lag bolts and detach the branches from the template. At this point, you have a finished template and pilot holes in your branches/poles.
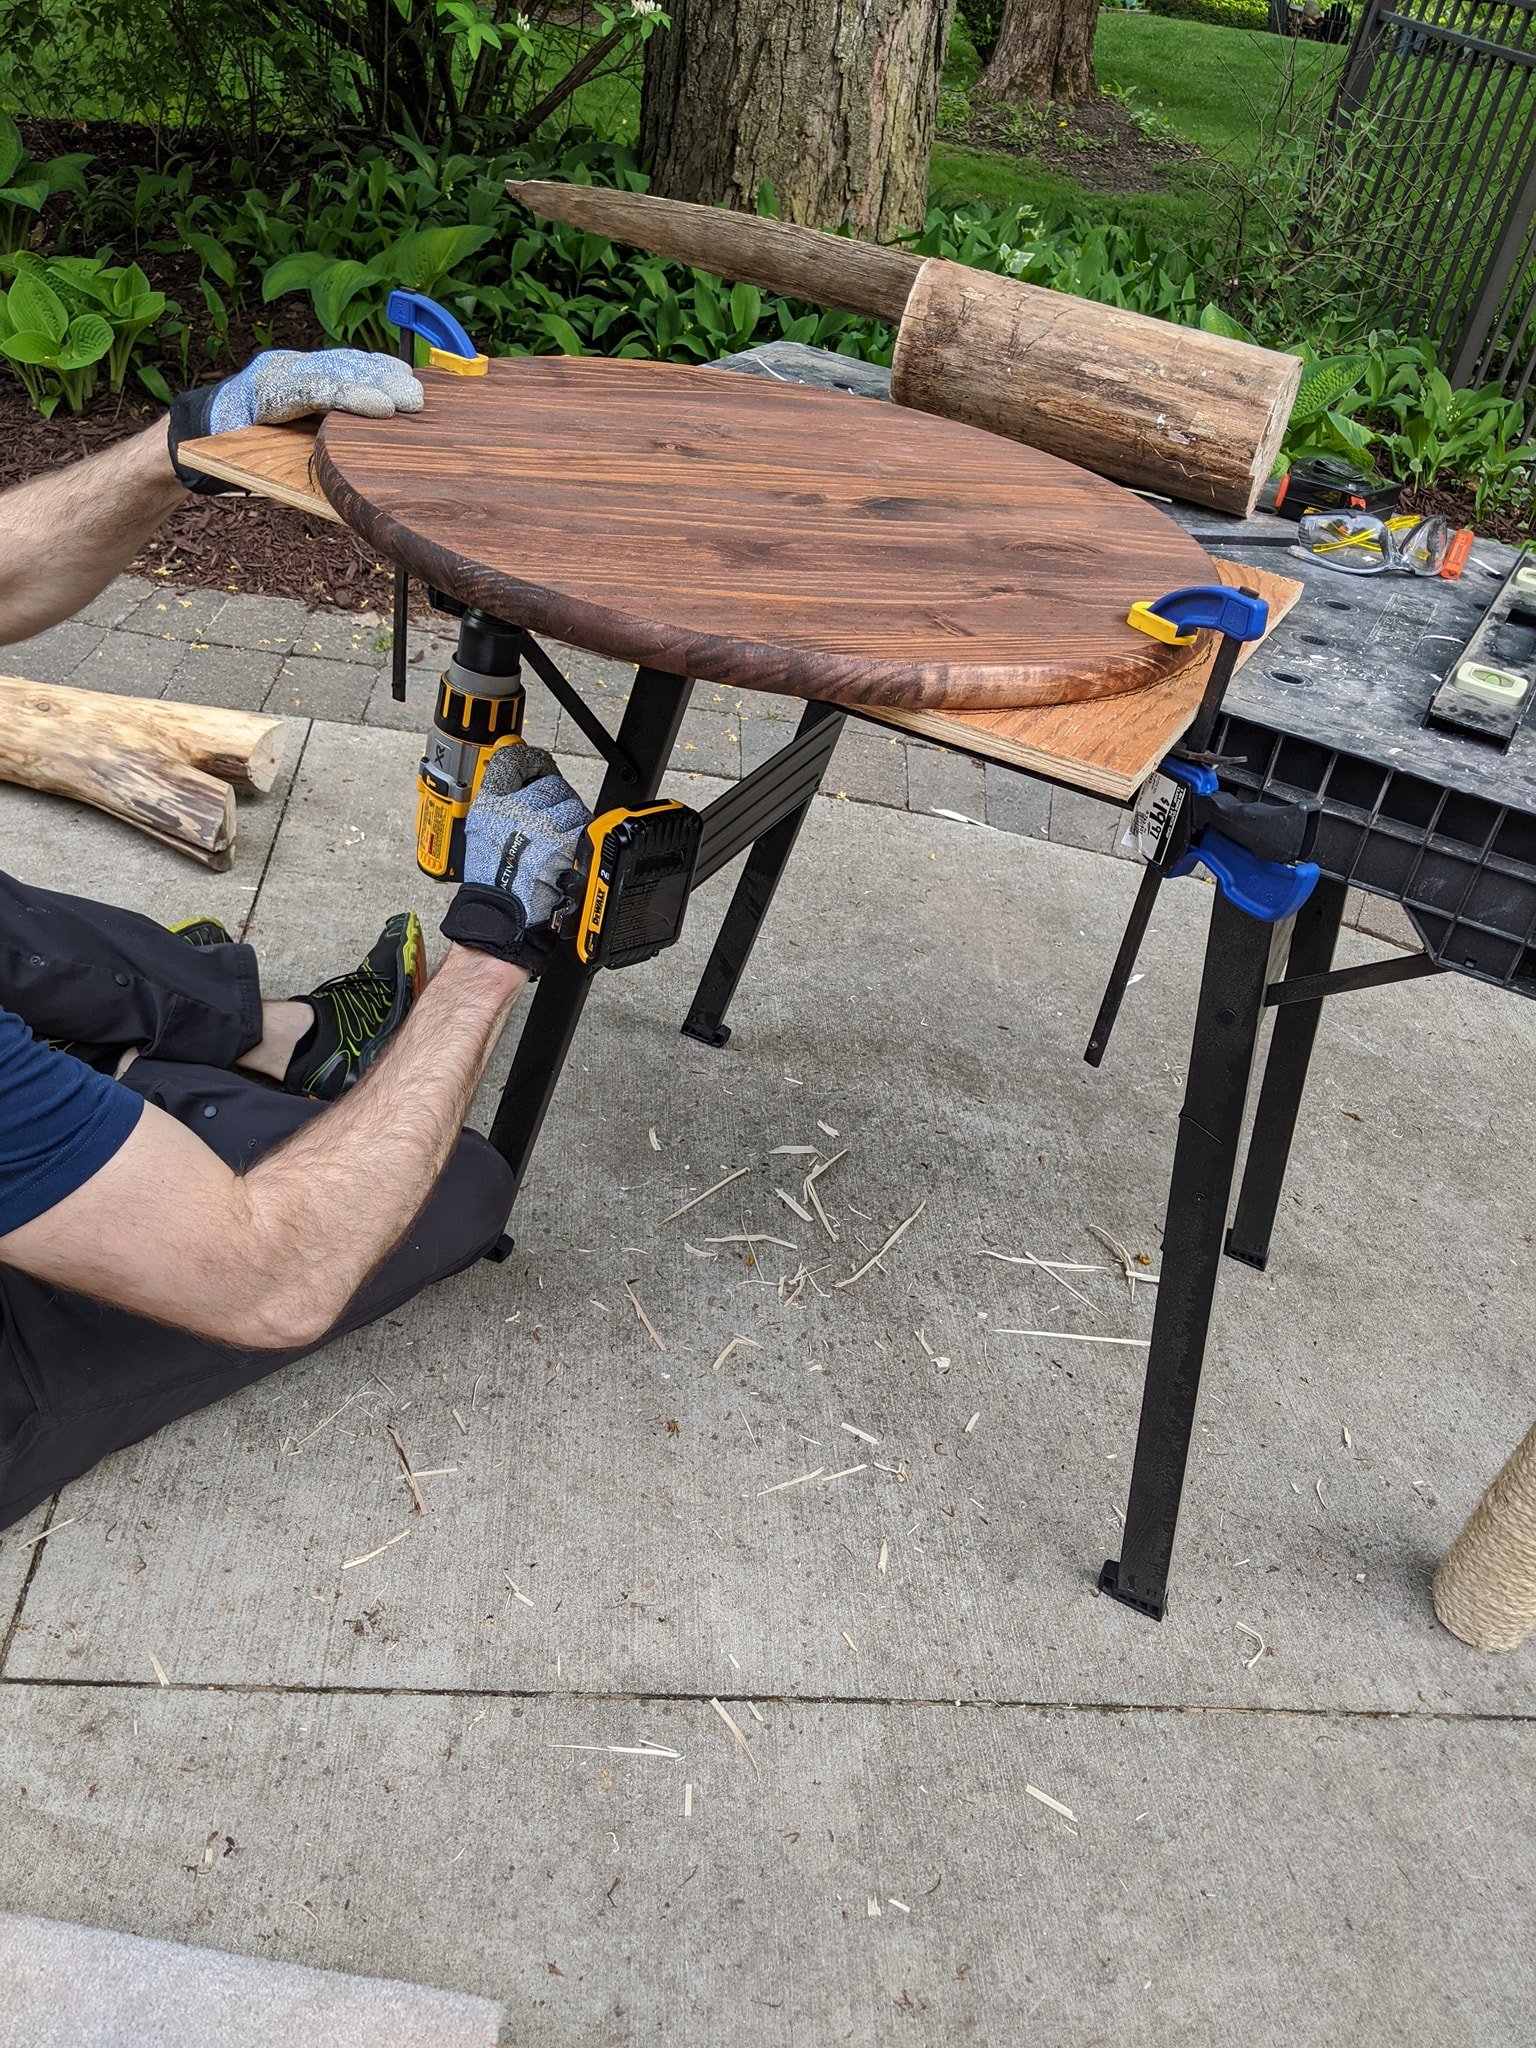
We then clamp the actual base to the template and use it to drill the holes for the finished tree.
Next, drive each lag bolt partially up through the base, and set the appropriate branch/pole using the pre-drilled pilot holes. Countersink the lag bolts so they don't mar your floors. You should have one bolt in each of the branches at this point. This allows you to turn the branches if needed when attaching the beds.
ROPE
I use 3/8" - 1/2" sisal or hemp rope. I order it from www.ropeandcord.com because it's cheaper in bulk. You can also buy it at Michael's or a local box store. Use a hand or pneumatic staple gun to affix the rope. I put the rope in places I think they'll use for scratching and aesthetically in higher areas.
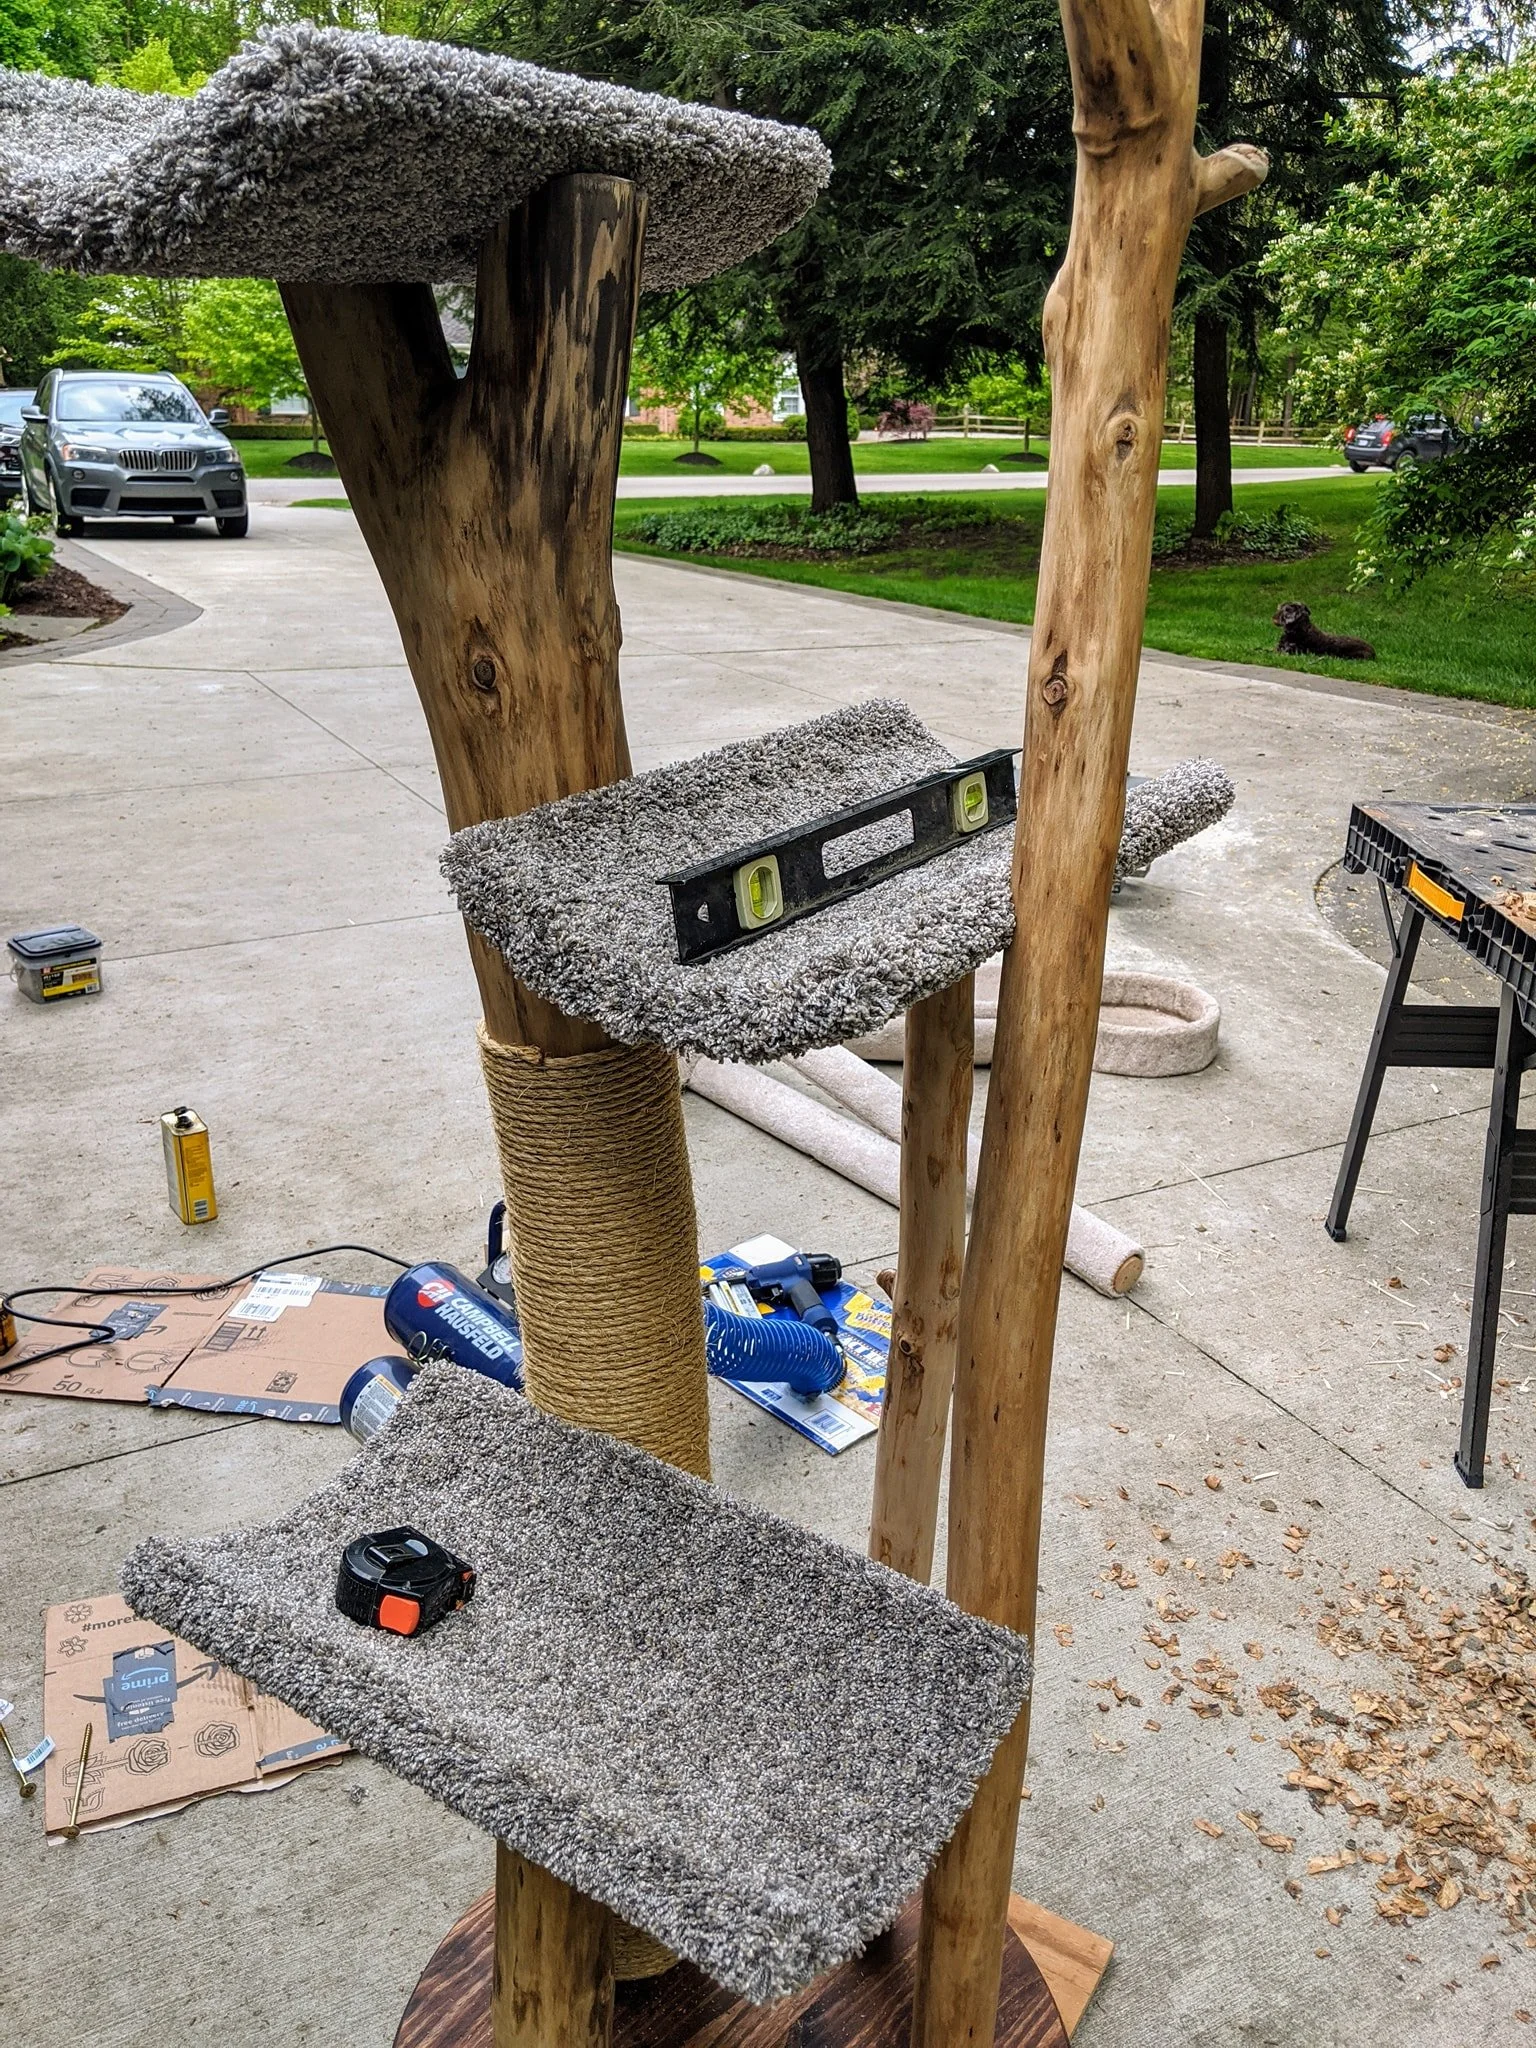
ATTACHING BEDS
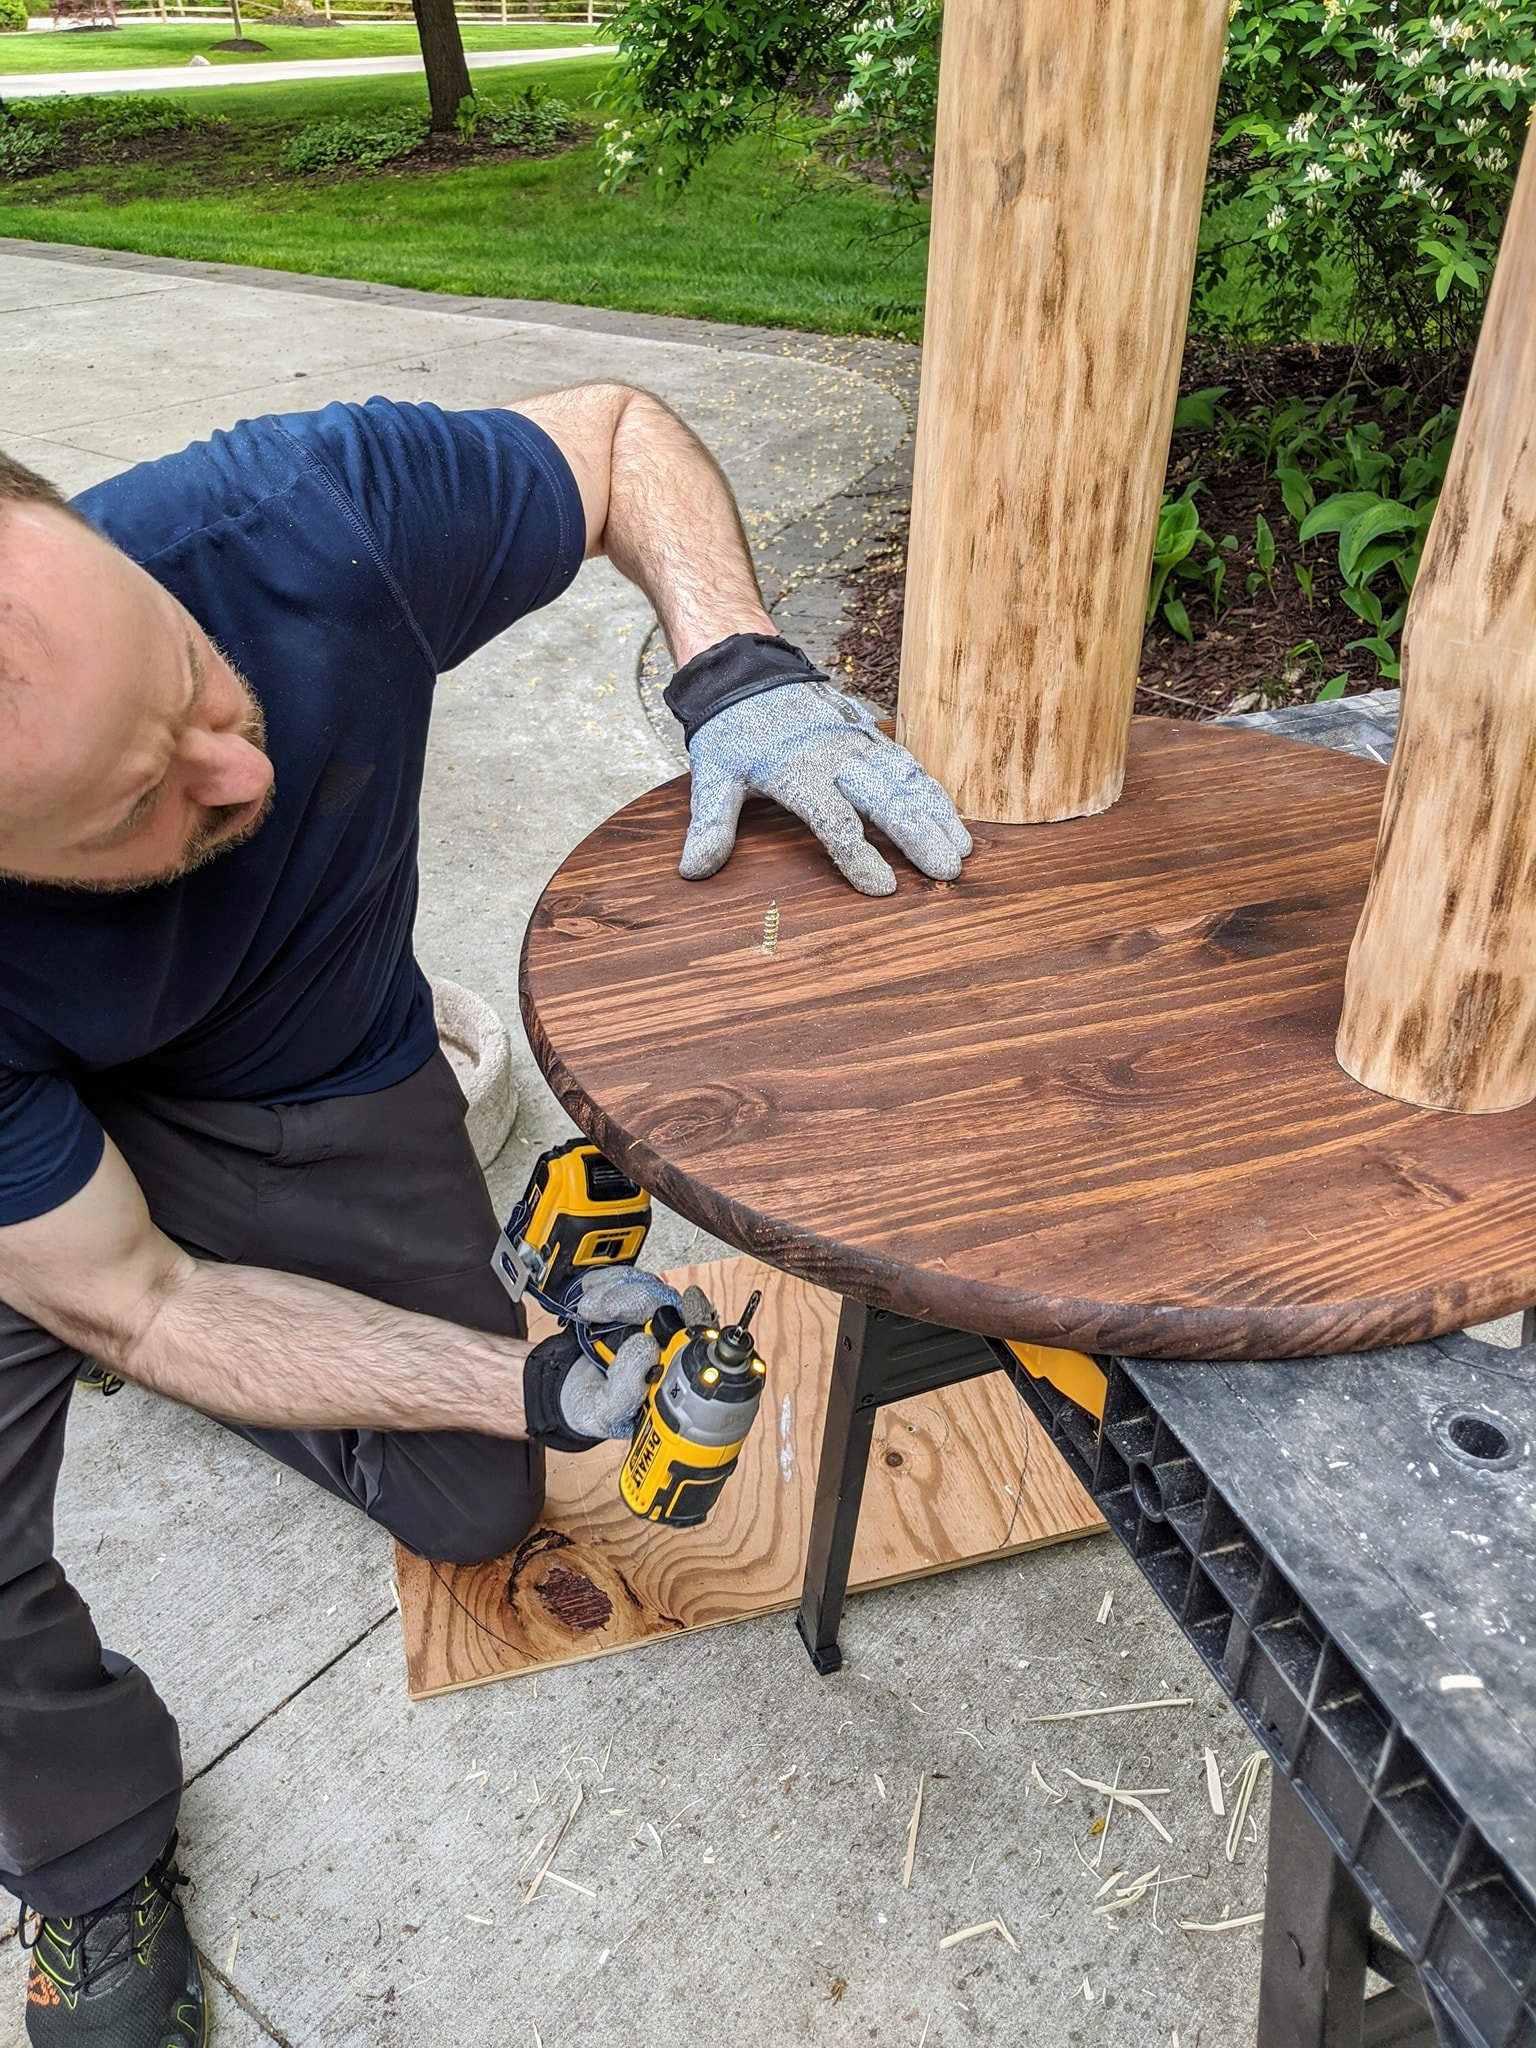
I space the beds approximately 20" apart. The more points of contact, the more secure the tree. With the lower beds, I try to have a base as well as attachment points to all of the upper branches. We use 3" screws and drive them through from the bed into the branch, so no screw heads are showing. (With smaller branches, you may need shorter screws.) Use a level, or it won't look as nice as you're hoping).
In this case, we ended up having to attach a smaller branch to one of the poles to stabilize the top bed I wanted between the branch crotch. When everything's in place and no longer turning any of the branches, we add additional lag bolts where needed, attaching the larger branches/poles to the base.
Help SAVANNAHGANS® Grow and Reach Every Savannah Cat-Owning Household! All support is humbly appreciated (visit the clickable underlined links).
Subscribe FREE (by visiting the banner on our home page) and receive each quarterly issue to your inbox.
Share this article on your own social media platforms.
Leave a Comment. (this is VERY helpful to our growth and Google recognition)
Follow on Instagram.
Follow on Twitter.
Follow on Pinterest.
Follow on TikTok.


Wood from downed trees
Beds
Base

Layout

Sisal Rope
Attach the beds